Thursday, May 10, 2012

Dirt Worm Treats

We made an edible craft today! We are learning about gardens this week, so I posted a sign-up sheet asking parents to bring in ingredients to make dirt worm cups.
We had Oreos, chocolate and vanilla pudding, gummy worms, gum drops (for rocks), and whipped cream and sprinkles just for fun. I never thought of adding rocks to it before. I've seen chocolate rocks in some stores. That would be perfect! And at the last minute I decided to use food coloring to make the whipped cream green (for grass)!
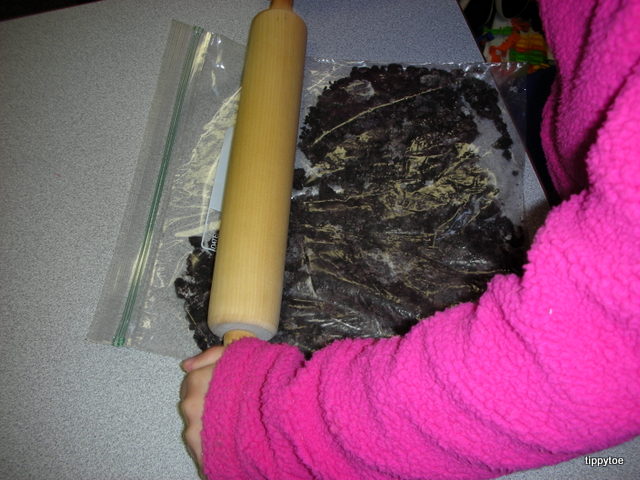
So we started by crushing the oreos with a rolling pin.
Then I put the crumbs into bowls and set out the other ingredients. The kids scooped some oreo crumbs into little cups. Then they added some pudding.
They kept going back and forth like that until they were out of pudding. Then they mixed it all together.

Next they added the worms and gum drops.
Finally, they scooped some whipped cream on top and added sprinkles if they so desired.

Here's the problem. We had Reddi Wip. When I stirred it to make it green, it basically melted and became runny. So I'd definitely recommend using real Cool Whip. I would have asked for that, but I didn't think of the whole grass thing at the time. Now I know.
We put them in the fridge and ate them for afternoon snack.

Was it yummy? Well, just look at these faces and I think you can answer that question!

:0)

**Linking up to Kids Co-op and Sun Scholars!**

K-Cup Flower Pots

When we had our Earth Day unit, I started saving K-Cups from our Keurig coffee maker. I didn't know what I wanted them for, but I knew I would come up with something. And then I started thinking about Mother's Day and it came to me:
First I cleaned out all the cups. This was very easy to do, although a little bit messy. I waited until I had collected enough before I cleaned them, so they were dry. I think that helped. Also, once you take the filter out, they are basically clean! So first you peel all the foil off the top (if a little bit is left on the rim, that's okay). Then you dump out what you can, and reach in to grab the bottom of the filter. Give it a little tug and it will come right out! So easy! The cups will be clean, but I threw mine in the sink with soapy water anyway. When the cups are dry, you're ready to paint. We used little acrylic paints because I wanted it to be durable and not peel off. (I've never tried painting them with tempera paint, which is what we use at school, but I was afraid it wouldn't last.)
We rinsed really well between colors and even blotted our paintbrushes so we wouldn't get the paint watery. The great thing about turning a K-cup into a flower pot is that it already has a hole in the bottom for drainage!
It's like it's meant to be, people! The kids did a really good job painting them. They found it easiest to shove their fingers inside the cup so they could paint all sides at once.
We didn't paint the bottom or the inside, and some kids painted the rim. They turned out so pretty!
I painted one, too! Mine was a hot chocolate K-cup so it had a little ridge like a real flower pot.
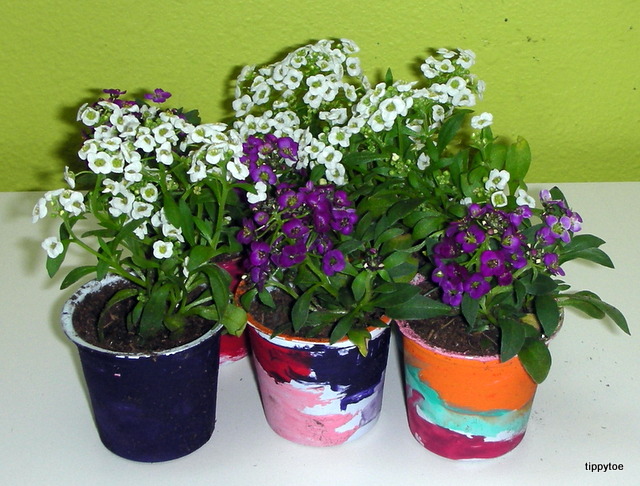
Then I went to our local Ace Hardware store to find some flowers. I decided to get little ones, since these pots are pretty small. They worked out perfectly! I had the kids scoop one spoonful of potting soil into the bottom of their cup, then I put the flowers in and added a little more soil to the top. I wanted to get a picture of this step, but my hands were filthy! We did this out on our playground to avoid getting our classroom dirty.


Didn't they turn out cute? I sent them home today along with our other Mother's Day gift. I think I will keep saving the K-cups. I'm sure I'll find more ways to use them. I searched the internet, expecting to find tons of ideas, but there's not much out there at all! I suppose it's only a matter of time.

**Linking up to the parties on my sidebar!**

Wednesday, May 9, 2012

Mother's Day Gift - Felt Flower Frames

We've spent the past couple of days working on our Mother's Day gifts. And it just so happens that it goes along with our Garden theme as well! I found a pack of felt flower frames at Michaels.
One looks like a star, but could easily pass as a flower. They are really cute and nice quality. They look stitched but are just glued together. They were $7.99 for 16, but when I bought them they were 40% off! So each child decorated one with sequins. I found a pretty pack at Jo-Ann Fabrics.
I set out four different colors for the kids to choose from. They used craft glue and a toothpick to apply them to the frames.


I just love the bright colors of the felt! And they are very thick and durable. I took a picture of each child, printed them out and cut them to fit the frame openings.
The kids also made their own wrapping paper by decorating butcher paper! I put out some plastic bottles and paint and we made flowers, just like we did for our Cherry Blossoms.
The kids loved doing that again and they turned out so pretty!
So after sticking a magnet to the back of the felt frames, I wrapped them up. The paper was a bit crunchy in places because of the paint, but that's fine.
This was only part one of our gift. Tomorrow I will have the second part. It involves K-cups and also goes with our Garden theme!

Tuesday, May 8, 2012

Vegetable Prints

Continuing with our Garden theme, today we learned how vegetables grow. And for art, we painted with vegetables! I just went through my fridge and took what I had. I found an old green pepper, very old cauliflower, and a pretty fresh potato. (I also had an onion, but I didn't think that was a good idea!)
I cut the pepper in half but only used one half for art. (The other half looked questionable, if you know what I mean.) I also cut the potato in half and cut a few random slices out of each half to make a design. (Kind of like our apple art from last fall.)
And the cauliflower we used like paintbrushes, although some kids stamped with them.
We got some really neat designs and the kids loved painting with food!


Monday, May 7, 2012

Magic Nuudle Flowers

So I was walking through Bed, Bath, and Beyond the other day and I found this:
They are generic Magic Nuudles and were on clearance for $9.99. (Who would pay $24.99 for these in the first place?) So I snagged the box, which has 1000 pieces. We are learning about gardens this week, so today we made flowers with these Stikits.
They are so easy to use! You can use a sponge, but I just wet a paper towel and put it in a bowl. All you have to do is dab the piece on the paper towel and it sticks to another one!
So easy! And they are biodegradable!


(Sorry, I was having a bit of fun with Picasa's editing!)
You can check out what we made last year with our Magic Nuudles here!

Thursday, May 3, 2012

Spinning Art

So Monday we learned about rain, and it rained. Tuesday we learned about clouds, and it was a very cloudy day. Wednesday we learned about lightning and we had a thunderstorm. I was a little scared to teach about tornadoes today! But so far, it's all good. My tornado art isn't anything special, but I thought I'd share it in case others are doing a weather or natural disaster unit and need a project to go along with tornadoes or hurricanes. Several years ago I bought a Paint-n-Swirl. Remember those from when you were a kid? Your paper spins around and you squeeze paint on it and it splatters in all directions. I brought that in to class today and each child was able to make one. Hey, it spins, therefore it goes well with a tornado theme, right?
(The paper was actually spinning when I took this picture!)

They turned out pretty cool. The more paint used, the better.

Some other things I brought in today were my cause and effect bottles. You know, where you combine oil and water, or water and glitter, and the kids can shake them up to see what happens. Well, two of mine reminded me of some natural disasters, so I decided to show them to the class. The first is my hurricane in a bottle.
It's just lightly-tinted blue water with lots of blue glitter. When shaken, the glitter goes "crazy" and I told the kids it was like a hurricane. (I may have been reaching, I know.)
Another bottle I have was filled with blue water and oil.
This was my tsunami in a bottle. If you turn the bottle on its side and gently rock it back and forth,


you will soon get some very cool "waves." The kids had a blast with this one. I also brought in my tornado in a bottle, but this one isn't homemade. I used to make my own with two soda bottles and a tornado connector, but that always leaked. Finally I bought a little one at my local Learning Shop. It was worth it because I used to do a natural disaster unit every year.
However, this one is very difficult for my kids to do themselves. You can't shake it. You have to move it in a circle quickly, like you are stirring something.
It was cool when it worked, but it's a challenge!
So there, now you have some ideas for your weather/natural disaster theme!


Tuesday, May 1, 2012

Cotton Ball Clouds

We learned about clouds today. I was so hoping to take the kids outside and do some cloud-watching, but it was a very gray day. Plenty of clouds, but no fluffy ones against a blue sky. I hope we'll get a chance to do that later this week. I saw this fun idea on Pinterest from The Techy Teacher about creating things out of "clouds" (cotton balls). I thought it was so cute! I set out cotton balls, glue and blue paper. I encouraged the kids to pull apart the cotton balls and shape them into different things. But I must confess, most kids just glued a bunch of cotton balls on the paper, then decided on the object they saw -- which is totally fine! Either way works. Then I printed out a poem to glue under the cloud. I changed it a bit from my inspiration because I wanted it to rhyme.
If you can't read it, it says, "I thought I saw a __________ when I looked up in the sky. But it was just a cloud gently floating by." If I did it again, I'd leave out the word "a" before the line. A couple times I had to add an "n" to make "an" and once I had to white it out because "a" wasn't needed. (One girl saw Bambie in a cloud!)
Some kids wrote the missing word themselves, for others I wrote it for them. The one above is an airplane. This next one is a boxing kangaroo!
 And this last one is a thingamajigger!
Before doing this craft, I read It's Your Cloud by Joe Troiano.
It's a wonderful story about finding things in the clouds.
I really wish we could have done some cloud-watching today. Did I say that already? It would have been a perfect activity to do before the craft. But since we couldn't, this book was the next best thing.