Showing posts with label garden. Show all posts

Friday, May 16, 2014

Peas in a Pod

We made adorable pea pods yesterday to go along with our Vegetable Garden theme! I knew I wanted to have the kids make some sort of pea pod craft, but I didn't know what. So I began looking through my craft drawers to see what I could use for peas. I found these pop beads that the kids sometimes use to brush up on their fine motor skills.
I had plenty of green ones so I decided to use those.
I snipped off the end easily with a scissors. Then I had to find something that could be the pod. These beads are pretty small, so I needed a small pod as well. I found a bag of seashells that I use for my beach unit. Although not perfect, I thought it would be good enough. So first the kids painted the outside of the shell with green paint.
When that dried, they painted the inside of the shell.
When that dried, I used hot glue to attach the beads to the inside of the shell. When the glue was cool, the kids used a thin black Sharpie to make faces on the beads.
They are so cute!
This pod has one pea yawning!
I love it! I tried putting magnets on the back, but all I had were thin self-adhesive ones and they weren't strong enough to hold the shell. I think those thick round ones would have worked. You could hot glue it to the back of the shell. But I just sent the pea pods home as is.
Oh, sweet pea...

Monday, May 13, 2013

Handprint Carrots/Footprint Flowers

We are talking about vegetable gardens this week, and today we made carrots with our handprints!
We dipped the sides of our hands in orange paint to make the carrots,

and dipped our fingertips in green paint to make the tops of the carrots.
It was a very simple project!
If they wanted to, when the paint was dry the kids could make a brown line across the carrots to show that the orange part grows in the dirt and the green park sticks out above the dirt.
And one more quick thing I wanted to show you, completely unrelated. Here is the Mother's Day project I made for my mom with my daughter's help.
It says "The only thing better than having you for a mom is my daughter having you for a grandma." It's a quote I've seen all over Pinterest. I used Elise's footprints to make the flowers and just quickly drew in stems and grass with a marker, although I wish I had used paint. It turned out very cute!

Friday, May 11, 2012

A Garden of Fingerprints

We did a very simple project today, but it was a lot of fun! We used very bright fingerpaints to make a garden!


I was hoping the kids would fill up their entire paper with flowers and other prints (like my example at the top, which I didn't make until after the kids made theirs), but that didn't happen. Oh well. We did have some beautiful pictures, though!


And now, for your viewing pleasure, I had a little fun with Picasa's editing program (which is very similar to Picnik)!!
 neon

 heat map

inverted colors

Ooh la la!

Thursday, May 10, 2012

Dirt Worm Treats

We made an edible craft today! We are learning about gardens this week, so I posted a sign-up sheet asking parents to bring in ingredients to make dirt worm cups.
We had Oreos, chocolate and vanilla pudding, gummy worms, gum drops (for rocks), and whipped cream and sprinkles just for fun. I never thought of adding rocks to it before. I've seen chocolate rocks in some stores. That would be perfect! And at the last minute I decided to use food coloring to make the whipped cream green (for grass)!
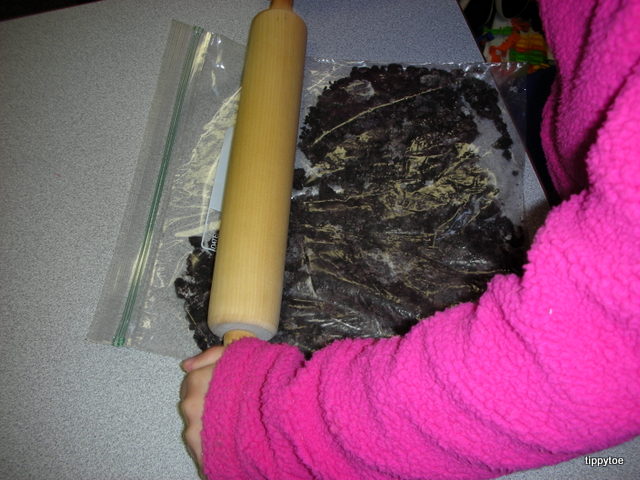
So we started by crushing the oreos with a rolling pin.
Then I put the crumbs into bowls and set out the other ingredients. The kids scooped some oreo crumbs into little cups. Then they added some pudding.
They kept going back and forth like that until they were out of pudding. Then they mixed it all together.

Next they added the worms and gum drops.
Finally, they scooped some whipped cream on top and added sprinkles if they so desired.

Here's the problem. We had Reddi Wip. When I stirred it to make it green, it basically melted and became runny. So I'd definitely recommend using real Cool Whip. I would have asked for that, but I didn't think of the whole grass thing at the time. Now I know.
We put them in the fridge and ate them for afternoon snack.

Was it yummy? Well, just look at these faces and I think you can answer that question!

:0)

**Linking up to Kids Co-op and Sun Scholars!**

K-Cup Flower Pots

When we had our Earth Day unit, I started saving K-Cups from our Keurig coffee maker. I didn't know what I wanted them for, but I knew I would come up with something. And then I started thinking about Mother's Day and it came to me:
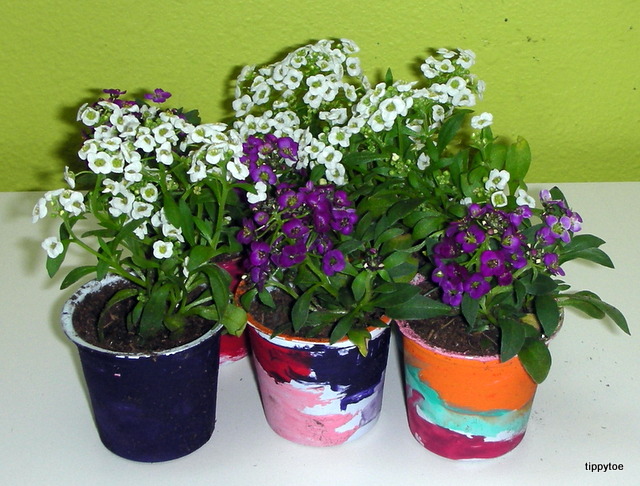
First I cleaned out all the cups. This was very easy to do, although a little bit messy. I waited until I had collected enough before I cleaned them, so they were dry. I think that helped. Also, once you take the filter out, they are basically clean! So first you peel all the foil off the top (if a little bit is left on the rim, that's okay). Then you dump out what you can, and reach in to grab the bottom of the filter. Give it a little tug and it will come right out! So easy! The cups will be clean, but I threw mine in the sink with soapy water anyway. When the cups are dry, you're ready to paint. We used little acrylic paints because I wanted it to be durable and not peel off. (I've never tried painting them with tempera paint, which is what we use at school, but I was afraid it wouldn't last.)
We rinsed really well between colors and even blotted our paintbrushes so we wouldn't get the paint watery. The great thing about turning a K-cup into a flower pot is that it already has a hole in the bottom for drainage!
It's like it's meant to be, people! The kids did a really good job painting them. They found it easiest to shove their fingers inside the cup so they could paint all sides at once.
We didn't paint the bottom or the inside, and some kids painted the rim. They turned out so pretty!
I painted one, too! Mine was a hot chocolate K-cup so it had a little ridge like a real flower pot.
Then I went to our local Ace Hardware store to find some flowers. I decided to get little ones, since these pots are pretty small. They worked out perfectly! I had the kids scoop one spoonful of potting soil into the bottom of their cup, then I put the flowers in and added a little more soil to the top. I wanted to get a picture of this step, but my hands were filthy! We did this out on our playground to avoid getting our classroom dirty.


Didn't they turn out cute? I sent them home today along with our other Mother's Day gift. I think I will keep saving the K-cups. I'm sure I'll find more ways to use them. I searched the internet, expecting to find tons of ideas, but there's not much out there at all! I suppose it's only a matter of time.

**Linking up to the parties on my sidebar!**

Tuesday, May 8, 2012

Vegetable Prints

Continuing with our Garden theme, today we learned how vegetables grow. And for art, we painted with vegetables! I just went through my fridge and took what I had. I found an old green pepper, very old cauliflower, and a pretty fresh potato. (I also had an onion, but I didn't think that was a good idea!)
I cut the pepper in half but only used one half for art. (The other half looked questionable, if you know what I mean.) I also cut the potato in half and cut a few random slices out of each half to make a design. (Kind of like our apple art from last fall.)
And the cauliflower we used like paintbrushes, although some kids stamped with them.
We got some really neat designs and the kids loved painting with food!