Showing posts with label pirates. Show all posts

Monday, September 1, 2014

Pirates

I have one last "summer" craft I'm trying to squeeze in before the new school year starts tomorrow. A few weeks ago we did a Pirate unit and I had the kids make little faces with paper plates. We used the small paper plates and I made skin-toned paint by mixing white and brown. The kids painted the plate and when it was dry, the boys had the option of making a beard with fingerprints. (They drew in a little mouth first.)
Then they all made little hats for their pirates. I cut out really small skulls and bones for them to glue on.
For the girls, I decided to give them all pig tails that matched their own hair color and style. I stapled them on to the sides of the plates and covered the staples with glitter glue (to look like rubber bands).
Then they finished drawing the face.
Finally, they added a wiggle eye and a patch, which was cut from black construction paper. They drew two lines coming from the patch to look like it was wrapped around the head. They turned out so cute!


I put them on my door with a sign that says, "My Students Aarrgh Great!"
It's been a fun summer with these seven kids of mine!

Saturday, August 4, 2012

Treasure Chests


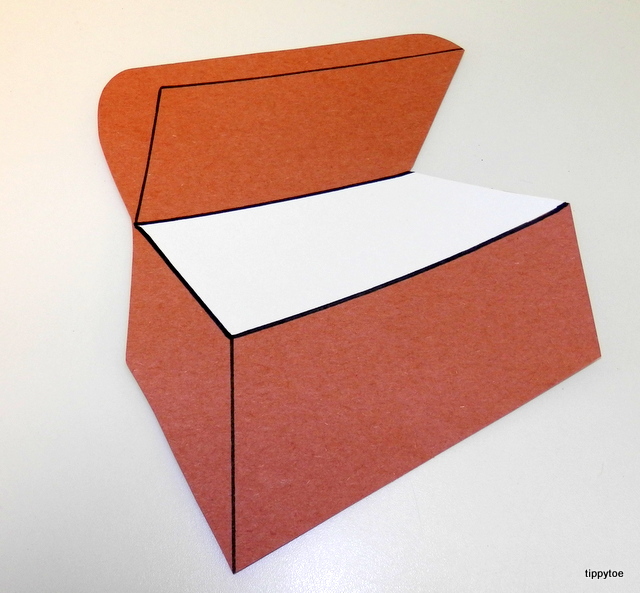
On Friday I asked the kids to bring in something special from home. Something that they would like to put in a treasure chest to keep safe. We had everything from jewelry to a Batman yo-yo. Then we did a little craft to go along with it. I made treasure chests by finding a coloring sheet of an open one and tracing it onto construction paper.
Then I added white paper for the "inside" of the chest.
It looked better once I added a few lines for dimension.
The kids could color treasure on the white part and decorate the chest with glitter glue.
Some kids drew what they had brought in to share that day, others drew things like gold and jewels.
The glitter glue pens were fun for the kids, but I reminded them not to squirt big globs. I told them to try to keep the pen moving while they squeezed.
Although my example was dry within a few hours, none of theirs was dry by the end of the day, so they will have to wait until Monday to take it home.

I hope you enjoyed our Pirate theme!

Thursday, August 2, 2012

Treasure Maps

Continuing with our Pirate theme, we made treasure maps today! I will show you mine first, then the kids'. I tore the edges of off-white paper to give it an aged look. Then I used crayons to make water and land and different "obstacles" like sharks and volcanoes. I included a little direction symbol in the corner and drew a dotted line with an X to "mark the spot."
I had printed out labels for the maps: Shark-Infested Waters, Snake Island, Volcano Valley, and Crocodile Creek. I wanted to keep it simple and the kids would be able to draw these things with basic triangles and squiggly lines. But before adding the labels, I crumpled up my map and smoothed it out again. Then I used a glue stick to add the labels.
To make it even easier for the kids, I drew pictures on little paper plates so the kids would know what the labels said.
That way I wouldn't have to answer the question, "What does this say?" over and over again. (Okay, so maybe I did this to make it easier on me, not the kids!) Then it was their turn. First they colored:
Then they crumpled and glued on the labels:
I tried to get each kid to make a cross with an N on top for North, and to make some sort of line with an X at the end. Other than that, they could color whatever they wanted.

They did a great job! The younger kids had a bit of trouble drawing pictures, but they had fun and their maps looked cool anyway!
We didn't make pirate ships this week because we made them for our transportation theme last fall.
Found out how we made them here!

Wednesday, August 1, 2012

Pirate Hooks

I'm sure I don't have to show you our pirate hook craft because it's been done several times over, but I'm going to anyway! I taped a craft stick to some aluminum foil,
and then rolled it up.
I used a little piece of tape to secure it. Then the kids squished and bent the foil into a hook shape.
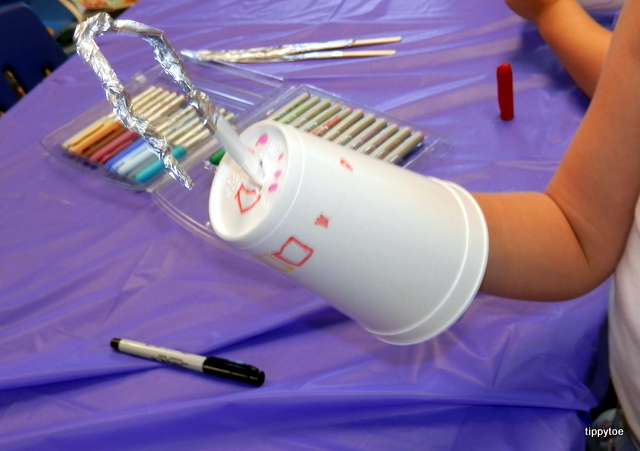
And then they used colorful permanent markers to decorate a styrofoam cup.
I poked the craft stick through the end of the cup. The kids can put the cup over their hand and hold onto the craft stick.
And there you have another simple pirate craft. I promise tomorrow's will be a little more complex!

Tuesday, July 31, 2012

Jolly Rogers!

I have another simple pirate craft for you. This time it's pirate flags, aka Jolly Rogers. I cut out some flags from construction paper,
and the kids decorated them with the same skulls and bones we used for our pirate hats.
Although I did print out the skulls in a smaller size so they'd fit on the flags better. Then I attached a bamboo skewer to the back with tape. I made sure the pointy end was covered with tape so the kids wouldn't poke themselves.


And yes, like the hats, I had all colors available. Most pirate flags were black, but there were a few red ones. The red flags meant the pirates on that ship would fight to the death and show no mercy. Just a little bit of trivia for ya!

Monday, July 30, 2012

Simple Pirate Hats

We started our pirate unit today! I always have mixed feelings about this theme. The kids love it, and of course it's exciting, but the kids can get pretty rough with their play. But it's only for a week, so I can handle it. For our pirate hats, I used large construction paper. To make a template, I folded one piece in half and drew half of a hat. Then I cut it out and opened it up. Each child got two hats stapled together on the ends.
I also cut out a bunch of skulls and bones.
The kids glued some bones and a skull to one side of their hat.
When their hat was dry, I stapled it again so it would fit their head better.
And yes, I had several colors available, not just black. It's more fun that way! I also had a little Pirate's Cove goin' on in dramatic play.
The kids could dig for treasure in the sand.
And they could dress up like pirates!
I got the masks, hooks and parrot from Party City several years ago. They really help the kids get into the pirate mood!

Thursday, October 13, 2011

Pirate Ships

Ever see a child's face light up at the mention of one word? Today that word was pirate. For we didn't make any ol' boat for our transportation theme, we made a pirate ship!
That was last year's ship. This year I went a little smaller. I found a coloring page of a pirate ship and used that as my template. I traced the boats onto several different colors of construction paper. Then I just drew free-hand some sails in different sizes. This year I also decided to make a little flag.
The kids used markers to decorate the boat and sails. Then they wrote the first letter of their name on the flag. I poked two holes in each sail, one at the top and one at the bottom, using a scissors and then put them onto pipe cleaners. The pipe cleaners were taped to the back of the boat and the little flag was taped to the top of one of the pipe cleaners.
The kids couldn't get to the art table fast enough to get started on these.