Showing posts with label circus. Show all posts

Friday, July 24, 2015

Paper Plate Lollipops

Here is a simple craft we made when we had our Circus theme. The kids used a black Sharpie to draw a spiral on a small paper plate.
Then they painted the plate with glitter paint.

When it was dry, I taped a straw to the back.
The kids loved them! I hung them up as is, but you could also wrap the top in plastic, gather it around the straw where it meets the plate, and tie a bow with ribbon. To see our other circus treats, go here.

Friday, March 6, 2015

Moving Circus Craft

I'm so excited to share this craft with you. It started off as a small, quick art project but then I kept adding to it. I love how it turned out!
First we made the tent from a paper plate. We used the tutorial from Honey Bee Books. I was just going to leave it at that, but then I thought it would be fun if the kids could draw some circus activities inside the tent. I put a piece of white paper behind the tent and realized it was a pretty small area to draw in. Since the tents could not be any bigger, I came up with the moving circus! It took some trial and error, but once I figured out what I wanted to do, it was quick and easy. I took a big piece of white paper and folded it in half lengthwise. (The paper was thin, so I chose to keep it folded rather than just cut it in half. If you use construction paper, it's probably thick enough you could cut two from one large piece.) Then I took a big piece of black construction paper and made two slits that would mostly be hidden behind the sides of the tent. I slid the white paper through the slits. Here is what the back looks like:
On the front, I taped on the tent using one piece of tape at the top and one on each side, making sure it didn't stick to the white paper.
The paper plate naturally stuck out above the paper, which made it very easy to slide the white paper back and forth. To prevent people from pulling the paper all the way out, I wrote a little "STOP!" about an inch in from either side of the white paper.
When you pull the paper to the left or right, you'll see the STOP in the corner of the tent.
Whether that will really prevent people from pulling the paper all the way through, I don't know. But it was the best thing I came up with. When it was time for the kids to color in their circus activities, they started at one STOP and drew to the other STOP. They did this while the paper was in the tent so none of their drawings would be covered up by the top of the tent.

I got a little worried here that maybe this would be too much for them, drawing all the little details, but they did a great job!

And since we used black paper as our background, we decided it would be a night circus and added gold and silver foil star stickers.


Of course, you can see the paper and drawings on the sides of the black paper when it's pulled to the left or right, but there's really no way around that. The kids didn't seem to mind at all! They loved it as much as I did!

 (Love the lion getting ready to jump through the ring of fire!)
And after all that, I decided to add one more thing. I cut out semicircles on the sides of the black paper so the white paper is easier to grab. And I drew a double arrow on each side as well.


When I hang them up next week, I will put this note up so everyone knows how they work:
So, do you love it?!

Monday, March 10, 2014

Circus Train and Carnival Games

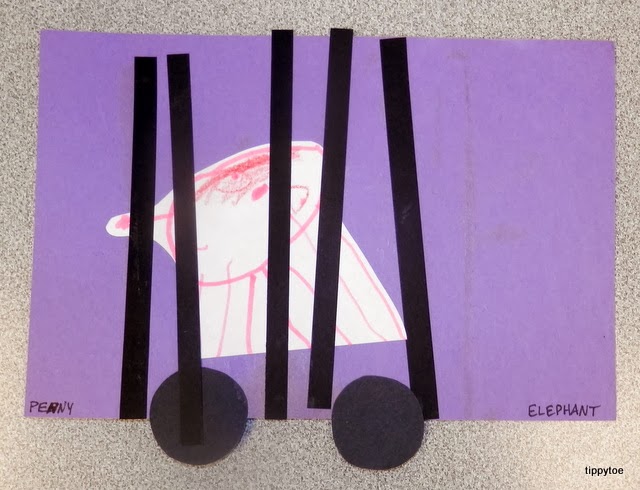
Last week when we had our Circus theme, my class made a train with animals. I was searching around for some good pictures they could color and paint when I realized it would be more fun if they drew the animals themselves!
They could draw whatever they wanted and I cut it out for them. Then they glued it onto a colored rectangle and glued on some black strips of paper for the bars.

Then they glued on two wheels. Among the animals on the circus train, we had a lion,
some tigers,

a seal,
an elephant,
and an octopus!
I printed out a train engine with a clown and hung up all the train cars behind it.
The kids really did a great job! And we had a little Circus Carnival! All week we've been playing these games, but on Friday I put all the games out at the same time and even set up a ticket booth.
The kids earned tickets for good behavior during morning free-play, circle time, snack time, and ZYLAR time (Zip Your Lips And Read). But they could also buy more tickets by answering questions from me about things I've taught them in the past. I printed out tickets from here. (I printed the white ones onto colored card stock paper.)
And I quickly came up with names for the games and made signs. Here's Juggling Ball Spectacular, where you throw little plastic balls through holes in cardboard:
And Quiet-as-a-Pin Drop, where you drop clothespins into a plastic container:
This one was my favorite. Clown Nose Toss, where you throw big pom poms (or clown noses) into little cups:
And we did Pin the Nose on the Clown (which I talked about here):
And finally, the kids' favorite, Bottle Knock-Out, where you throw little rubber prickly balls at some plastic containers and try to knock them off the shelf:
(Side note: those plastic containers had Puffs baby snacks in them. My daughter loves them and I've been saving the containers to make her a bowling pin set!)
Anyway, the kids had a great time! It was so fun, in fact, that we invited the 3-yr-old class to come over in the afternoon. My kids ran the booths and showed the younger ones how to play the games. And then everyone got to pick a prize! It was a wonderful way to end the week!

Thursday, March 6, 2014

Class Clowns

Here come the clowns!
I took pictures of the kids and used the Pencil Sketch editing tool on Picasa before printing them out as 5x7s. I forgot to print them on card stock paper, so I ended up cutting them out and gluing them to the card stock instead. I put out markers, pom poms and scrap paper for the kids to use to make themselves into clowns.
To make the big collar that some clowns have, the kids could cut it out themselves or they could use the ones I started for them. I just took a rectangle and cut a "dip" where the neck would be.
They just had to cut the bottom in a silly way and glue it on.

Then when I cut the whole picture out, I rounded out the collars a bit at the shoulders. They could also make hats with the construction paper and pom poms. They turned out very cute!

I hung them in the hall with the title Class Clowns.
We also played Pin the Nose on the Clown! I drew a big noseless clown onto poster board and hung it on the wall. Then I blindfolded the kids one at a time, spun them around and they had to stick a pom pom on the clown!

I used masking tape and it went on and came off without any trouble at all. Tomorrow I'm going to try a different game with it. If it works out, I'll be sure to let you know!