Showing posts with label Dr. Seuss. Show all posts

Monday, February 29, 2016

Pants With Nobody Inside Them

This is an activity my class did last year, but I never posted about it. It was during our Dr. Seuss week, which is probably happening in many centers and schools right now in honor of his birthday on March 2nd. I read the book, What Was I Scared Of? and then gave the kids a cut-out of a pair of pants. They had to first decorate the pants any way they wished, then draw a picture to go with the pants.
At the top of their papers I wrote two lines from the book ("I saw a pair of pale green pants, with nobody inside them!"), but I changed "pale green" to whatever the kids wanted to call their pants. We had tomato pants, rainbow pants, ghost pants, blueberry pants and flower pants, as well as others. It was a very fun activity! During group time, the kids came up and described their pictures to the class.

I'm not sure why I didn't blog about this last year when we did it. I think I had thought of ways to do if differently so I was waiting until this year when I could do it again. But since I'm not in a classroom this year, I decided to share this instead. Maybe it will inspire you!

Thursday, February 26, 2015

Horton's Clover Craft

Here is a quick craft to go along with the book Horton Hears a Who by Dr. Seuss. I traced a flower cookie cutter and then enlarged it to make my clover template. I cut out the clover from many different colors of construction paper. Then I cut big squares of tissue paper that matched the clovers. The kids scrunched up the tissue paper, dipped them in glue and stuck them all over the clover.

When it was dry, they cut a strip of green paper to make a stem. I taped it to the back of the clover.
A few days prior I had taken a picture of each child with their hands around their mouth, with their mouth open, to look like they were shouting.
I printed them out wallet size, cut them out and stuck them in the tissue paper using a glue stick.
I displayed them in the hall with the title, "A Person's a Person, No Matter How Small." And I printed out a few "WE ARE HERE" phrases to put up among the clovers.


The kids' pictures are definitely bigger than the Who in the story, which actually was an entire town of Whos on a speck of dust on a clover, but you get the idea.

For another Horton Hears a Who craft, check out what we made a few years ago here.

Tuesday, February 24, 2015

The Cat's New Hat and Dr. Seuss Bingo

We started our Dr. Seuss theme yesterday. I always have so much fun with this unit! It seems the craft ideas are endless. I told my class that the Cat in the Hat called me to say he lost his hat. He was wondering if we had seen it. (Nope.) And if we hadn't, could we possibly design a new one for him? (Of course!) For each child, I drew a tall hat on white paper and put out a bunch of art supplies for the kids to use. We had markers, glitter glue, foam hearts and paper flowers. I also put out scrap paper and scissors. The kids did a wonderful job designing new hats.


There were no two hats alike and everyone really took their time making the best hat possible for the Cat. I think he will have a hard time choosing which one will be his new hat!


I'm tempted to make a big Cat so each child can put his or her hat on its head for a picture. If I do, I'll be sure to update this post.
I also made a Dr. Seuss Bingo game for the class. I did it the same way I made my Polar Bingo a couple years ago, by using the site SEN Teacher. You can search for certain pictures and they appear in a box. You can label them and change the size and borders. So I searched for Dr. Seuss characters. I made 16 different cards and put 8 on each bingo board. I made 8 boards total. Then I printed out the 16 character cards just by themselves, but a little bigger, to be the drawing pile. I laminated everything.
I put the game out with sparkly pom poms as the markers, saying they were clovers from Horton Hears a Who.
The kids are really enjoying it!

Friday, February 28, 2014

Yertle the Turtle & Wacky Wednesday

We finished up our Dr. Seuss unit today and I have a few ideas to share with you. We read Yertle the Turtle.
The kids really liked this story! They felt bad for poor Mack at the bottom of the pile. And of course, when he burped there was a room full of giggles! For the craft, I cut out a "flattened" turtle shape for the kids to color.

I cut them from card stock so they'd be sturdy because I wanted them to stand on their own. I was lucky enough to find a blue egg carton in our storage room (a much lighter blue than the turtles in the book, but a blue nonetheless) and cut it apart to make the shells. I ended up just taping the egg cup to the paper and it held up great. I bent the legs down and they became the cutest little turtles!

And of course, to go along with the story, we tried to see how many we could stack. This didn't work very well because the bottoms were now flat from the paper, but we did manage to get 4 on top of each other.
Every time we added a fifth, the stack would come tumbling down! There were a lot of kids holding their breath when it came time to add the fifth one! So fun!
We also had Wacky Wednesday, in honor of the book by the same name. (Although it's not a true Dr. Seuss book, I did explain to the kids that it was written by the same man using a different name.)
The kids dressed a little crazy!
The book is filled with silly things that the kids have to find on every page, so for art they drew their own wacky pictures. Then they shared them with the class so we could all find the silly things.

Multiple suns was a common one, as well as floating things, like cars and trees.
See the silly thing in this picture above, besides the suns? The man is driving a tractor with his feet backwards! My kiddos are so creative, I gotta love 'em.

Tuesday, February 25, 2014

Daisy-Head Mayzie

We are celebrating Dr. Seuss books this week! Today's was Daisy-Head Mayzie, which I have never read before. It's a wonderful book!
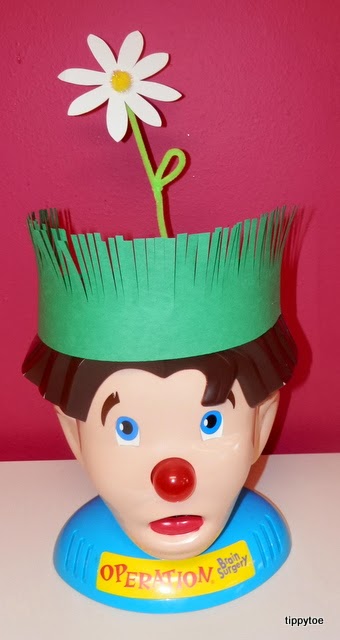
As you can probably tell from the title and picture, it's about a little girl who has a daisy growing out of the top of her head! So today we made daisy headbands.
I couldn't resist putting my headband on the Operation guy. We studied our bodies last week and this was still left out on my desk. So cute! Anyway, I cut green construction paper up like this:
One thin strip and then I cut the remaining paper in half. I wasn't perfect with my cutting. No ruler lines here! The bigger sections are for the grass and the little strip was added to the back so it fit on a child's head. If you use large construction paper, you might not need to add a strip. Also, this gave me two grass sections per paper, but only one strip so I had to cut a few more strips from another piece. Make sense? Anyway, the kids used scissors to make a fringe along the paper.
I told them they could just do one cut for each blade of grass. You know, cut and move over, cut and move over, and so on. But because their scissors are so much smaller than mine, the grass slits weren't very long. So I ended up cutting off part of the paper so the headband wouldn't be this big wall of green paper with a little fringe on top. It would look more like grass. So in hindsight, I could have easily cut the construction paper into thirds, and then cut the extra strips from another piece.
When the grass was done, they moved onto their flowers. I decided to let the kids make any kind of flower they wanted using any color of paper. (It's just more fun that way!) But this is also where it got a little difficult for them. I wanted them to draw their own flower and then cut it out. But they really struggled with it. A few kids drew very complicated flowers, with lots of petals, and then had a hard time cutting them out. So we kind of compromised. I said either I could draw a simple flower for them and they could cut it out, or they could draw the flower and I would cut it out. That seemed to work much better.
When the flower was done, they added a middle and a stem, using pipe cleaners and sparkly pom poms that were sent to me from CraftProjectIdeas.com.
I also let the kids pick any color stem they wanted, instead of just using the green. So they picked their pipe cleaner and I cut off the bottom third and they used that piece to make a leaf.
We used glue dots to attach the pom pom to the middle of the flower. Then I stapled a strip of green paper to their grass and taped on the flower so it would be at the back of their head.
Then I measured their heads and stapled the other side appropriately. If the flower drooped a little, I just made the stem shorter and re-taped it.
At first, only the girls made one.
But after I lined them up to take their picture, a few boys came over to the art table. Yay!

Wednesday, February 27, 2013

Thidwick, the Big-Hearted Moose

I wanted to do a craft that went along with a Dr. Seuss book that was a little less common. When I found Thidwick, the Big-Hearted Moose, I thought it would be perfect. I had never read it before and none of the kids in my class had, either.
Although I found several cute moose crafts online, I wanted to keep it simple. I could go into labor any day now and I didn't want anything complicated for my sub. So I found a coloring sheet of a cute moose (here) and traced just the head onto another piece of paper.
The kids drew creatures on the antlers (to go along with the story) using pens and crayons. I told them they could make up their own critters, as Dr. Seuss often does.
 
Then they colored their moose.


The kids did a great job drawing their creatures!