Showing posts with label dramatic play. Show all posts

Thursday, July 31, 2014

Lassoin' Cowboys and Dress-Up Fun

I'm finally wrapping up our Wild West week, about 3 weeks after it happened. For this last project, I printed out a coloring sheet of a cowboy (found here), used white-out to get rid of the lasso and photocopied it on the far left side of the paper. The kids colored the cowboy and drew in a background.
Then they used white glue to make a line from the cowboy's hand to the right side of the paper and make a loop. They put a yellow piece of yarn on top of the glue to make the lasso.

All week long, the kids were dressing up as cowboys and cowgirls. I brought in a bunch of props, like hobby horses, cowboy hats and handkerchiefs. I also brought in two vests that my mom made for one of my classes many years ago. She also made some "chaps" with fake leather material and pieces of elastic. I thought the kids could wear one on each leg, but they just wrapped one of them around their waist and were good to go!

We also had a Wild West Day, where the kids came to school dressed as cowboys or girls. We had the cutest bunch of cowgirls I ever did see!


Tuesday, December 10, 2013

Prince Crowns and Damsel Hats

We are talking about fairy tales this week so I decided to take it up a notch and teach the kids about Medieval Times. I even made a "castle" in dramatic play by using large white paper. I put it up on one wall, cut out some windows and drew vines on it.
It was bigger, but I had forgotten about the intercom on the wall, so I sliced off a little from each side. It was actually very easy to make. I've made something similar a few times at my other center, but my room had drop ceilings so I was able to hang the castle wall from the ceiling. I would make two walls and hang them in the corner so the kids could actually play inside the castle walls and look out the windows. (Sorry there are no pictures. It was pre-blog!) But there's no way I could hang it from the ceiling in my current center so I did the next best thing by taping it to the wall. I also brought in some princess and knight masks for the kids to wear.
The masks came from on old computer game I had (Kid Pix Adventures) and I've been using them for years. The princess mask is actually a Cleopatra mask -- it has a snake on the crown!
Anyway, today the kids made their own crowns. I made the prince crowns with large construction paper and the princess crowns (or damsel hats) with the same big white paper I made the castle out of. We used some self-adhesive jewels that I received from CraftProjectIdeas.com.
They were the perfect touch that our crowns needed. I also put out some foam heart stickers (and a few frogs, because a kissed frog might turn into a prince!).

I had to add a piece of scrap paper (that I saved when cutting out the crowns) so they'd fit around the boys' heads. Now, the damsel hats were a bit more complicated. I only have two girls in my class so I didn't mind the trouble. Many years ago I ordered damsel hat crafts from Oriental Trading Company and saved one for my template. It was too big for construction paper, which is why I used the big white butcher paper. However, the white paper was super thin and not ideal but I was able to work with it. Here's how it looks cut out:
The girls decorated the paper the same way the boys did.
Then I added a bunch of ribbon to the top. I just taped the ends in place. In the past I've also used crepe paper instead of ribbon. It works just as well.
Then all you have to do is roll it up and staple or tape it together. My paper was very flimsy which made this step difficult. I've also cut big circles out of paper and cut a slit halfway through the circle and then just rolled it into a cone that way. That was actually easier, but you waste a lot of paper when rolling it up and most of the decorating gets hidden.
The ribbon hangs down the back of the hat.
These hats don't stay on well so I added an elastic string to go around their neck. Because the paper was thin, I made the area that had the hole punch in it stronger by putting packaging tape over it. Does that make sense? All the trouble was worth it, though, because they all loved wearing their royal crowns!

Monday, June 25, 2012

Dramatic Play: Mission to Space

It's past my bedtime, but I wanted to quickly show you what I set up in our dramatic play area for space week.
About 8 and a half years ago, my sister and I made a rocket out of boxes, aluminum foil, and lots and lots and lots of packaging tape. And I finally get to share it with others! I'm proud to say it's still standing, as you can tell, with only a few repairs. Aluminum foil is so easy to repair! We used one big box for the bottom and cut out a little window, but only cut three sides. We turned the piece we almost cut out into a little control pad. (I just remembered that during my first year teaching, I actually brought in my Atari joysticks for the kids to use to control the rocket!!)
You can flip it up to close the window. For the top part, it's mainly one square box with 4 pieces of cardboard cut into triangles to make the point. I taped all the triangles together to make a point before I covered it with aluminum foil. We also cut out a window from the top part. On the inside, I taped on a picture of the Earth as seen from the moon (and made it look like a window), and wrote some destination buttons and count-down numbers right onto the cardboard.
I used some wooden dowels to make the box stronger. When putting the two boxes together, we cut a hole out of the bottom box's top flaps.
So then the top box just gets centered over the hole and taped on.
This way the kids can stand up inside the rocket!
I also have two soft astronaut helmets that my parents got me from a souvenir shop in Houston, TX. (On a side note, I have a brother who lives there and he designs robots for NASA. So I have a ton of space-related things from all my trips and my parents' trips to Houston!) But I have also made astronaut helmets out of paper chef hats and large popcorn buckets from the movie theater!
I hung up an inflatable space shuttle and astronaut among the stars. I also put up a couple posters.
I turned our little kitchen around and hung up some starry night fabric. Then I printed out pictures of the planets and other objects in our universe. Again, I did this many years ago and just keep using them over and over again.
The kids had a lot of fun playing in it today! And I have more surprises for them (and for you!) later this week. The best part about the rocket is that it collapses nicely for storage. The bottom is all connected so it just folds up.

Not bad, huh? The top box doesn't fold, but it's not that big.
So, what do you think of our rocket? (Sarah, do you remember when we made this together?)

Tuesday, June 19, 2012

Dramatic Play: Campsite

To go with our camping theme this week, I brought in a little tent. It was given to me by my sister several years ago. I put little lanterns (from Culver's, also given to me by that same sister long, long ago) inside so the kids could read books.
You can see I also put out some lincoln logs for the kids to make a fire. And I made some fishing poles out of wooden dowels, yarn and paperclips. The kids can turn them around and use the other end if they want to roast marshmallows!
The four little fish that I printed out and laminated are on the side of the tent. And I hung up some of my stars from my space theme so the kids could sleep under a starry sky. (I wish there was a light right above dramatic play so I could hang more stars up, but I just put the rest on the wall.)
The class is really enjoying it. Here's a couple cuties cooking their freshly caught fish over the fire!
It's not the greatest dramatic play campsite ever, but I thought I'd share it anyway. The area is very small and I have to put everything away daily because we have other classes in our room in the mornings. So this is just enough to give the kids a special place to play without a huge time-consuming project for me!

Tuesday, June 5, 2012

Dramatic Play: Dino Camp

So I told you I'd be back today to show you our Dino Camp. It's pretty fun.
Last year I bought an inflatable Pteranodon from Amazon. This was to replace the Quetzalcoatlus I made several years ago and was pretty much on it's last leg. I wish I still had a picture of it, but basically it was made out of paper and then stuffed with paper so it was 3D. And the wings were huge compared to this little guy. But the Pteranodon is much easier to hang up and to store when not in use. So it was worth it. I also made a Dino Camp sign.
I wanted it to look like it was a banner made from fabric, but it's really poster board. I used stencils for the letters and printed out dinosaurs from a greeting card software I have, then glued them to the sign. I also used the same T-Rex skeleton from our craft today, but printed it out poster-size. So it printed on a bunch of pieces of paper and I had to piece it together and cut it out. I turned our little kitchen around and covered it with paper, then hung up the skeleton. I also put up some other pictures of dinos with their names.
The kids enjoy looking at this and guessing the names of the dinosaurs. During center time, I put out our sand table and fill it with bones. They are actually of a human skeleton that I got around Halloween several years ago. The bones were connected with rope so I just cut them apart. I gave the skull to my nephew and use the rest for dino camp.
The kids use paintbrushes to brush off the sand and carefully remove the bones.

Then they try putting it together into a dinosaur shape. (Without the human skull to give it away, they have no idea they aren't dinosaur bones!)
I also bring in my T-Rex game, which is like Operation.
The kids extract bones from rock with a tweezers. It doesn't work anymore, but it used to roar if you touched the tweezers to the metal. The kids are really having a lot of fun with everything!
And I think the Pteranodon is the perfect touch.

Right next to Dino Camp I have all my library books for the kids to read.
This is a very popular center. You can see that big claw in the picture above. That is one of those "Life Size" books. Awesome. Here is a link to it on Amazon, but I'm sure you can find it at a nearby library.
So, do you think your kids would have fun at my Dino Camp?

Wednesday, August 24, 2011

Dramatic Play Jungle/Rainforest

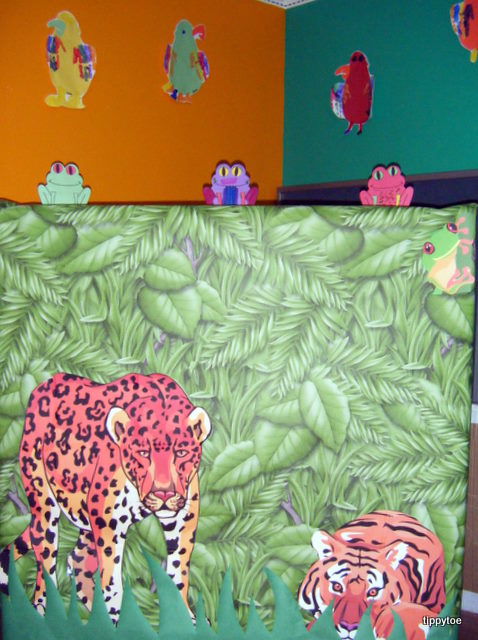
Since I showed you our cute sloths yesterday, I thought I'd show you what our dramatic play area looked like at that time. I found "jungle" bulletin board paper at Michael's and had a 40% off coupon, so I couldn't resist buying it. I turned our kitchen set around and wrapped the paper on the back. Then I taped on huge animals that I had printed out on my computer. I used clip-art from a greeting card software program I have and then printed them poster size, so I had to fit them together like a puzzle. And I added some grass that I cut from construction paper.
I also wrapped paper around the thing that holds our dress-up clothes.
From the ceiling, I hung strips of green paper and stuffed animals.
On the ground, I put out a green sleeping bag and a bunch of library books about the animals that live in the jungle. I also had two pair of binoculars for the kids to use. Everyday we added our art projects to the jungle area. (You can see parrots and frogs on display in the first picture.)
Many, many (MANY!) years ago, I used some of the big animals for our Safari week, since some animals live in both places. For that I taped the animals onto light blue paper
and didn't have anything hanging from the ceiling. Then I made a jeep out of boxes. Yes, a jeep! I don't know what I was thinking.
I put 4 little chairs inside the jeep and again had binoculars for the kids. It turned out very cool (it even had a steering wheel!), but only lasted that one week because I had painted the boxes so they became soft and bent very easily. But the kids liked it while it lasted, and I am so glad I took a picture of it!
Click here to see our safari crafts!