Showing posts with label polar bear. Show all posts

Friday, January 23, 2015

Polar Animal Crafts

This past week my class studied polar animals. Since my crafts were mostly "reruns" that I tweaked a bit and ones I copied from other people, I thought I'd quickly show them all in one post. I will link back to my original posts if you would like further instructions.
I decided to add some color to our crafts this week. Some by choice, others not so much. First up is the penguin. I used this craft, but cut the body and flippers from all different colors of paper, just for fun.

When we learned about polar bears, I used a craft I found at Mrs. Nessman's blog. I loved it! The kids used crumpled up waxed paper to make ice for their polar bears. They did all the tearing and crinkling and gluing themselves. I had already cut out the polar bears for them. They just added eyes and noses with a black marker. So cute!


I think next time I might try having them watercolor the background before adding the waxed paper.
For our seal pup craft, I had planned on making the same craft we made last year, but I forgot my fake snowflakes at home. So instead I found colored sand and asked the kids if they would mind making colorful seal pups. Of course they loved the idea! So they painted with glue and sprinkled on the sand.


Then came the snowy owls. We used the same technique as our puffy paint owls, but we just used regular white paint instead of making puffy paint. The kids used little porcupine balls to stamp an owl shape on their paper.
And then they added yellow eyes and brown beaks. I was low on blue paper, so we had colorful backgrounds instead.


I love all the colors!
I added in one more polar bear craft that I found at Mrs. Payton's Precious Kindergarteners. We made huge polar bear paws! The average polar bear's paw is 12 inches across, so I got the biggest white paper I could find and drew a paw shape on it. Kind of like an oval, kind of like a rounded rectangle. The kids cut them out themselves.
 I cut the claws and paw pads out for them and they glued them on.

But I took this craft one step further and added their footprints!
Then, similar to when we studied gorillas and we made our hand prints on top of a gorilla's hand print, I asked the kids what they would do if they ever met a polar bear. A friendly polar bear. I wrote their responses down and displayed it in the hallway.


And all week long, the kids could play with polar animals in water beads! The clear is the ice, the blue is the water.
I hope you enjoyed my polar animals recap!


Tuesday, January 21, 2014

Polar Bears at Twilight

I saw this amazing art project at That Artist Woman that involved several techniques for texture. (You really should head over there and a take a look.) Unfortunately, I didn't have the important supplies, like watercolor paper, disc tempera paint and/or an ample supply of watercolors. So I had to change some things and also make it a little easier for my class, and although they don't look as cool, they are cute and were fun to make. So here is how we did it. The kids used a pencil to draw a horizon line on a piece of white construction paper. Then they painted the top part with very watered-down tempera paint.
While it was still wet, they stamped out the full moon the same way Gail did, by putting a tissue over the end of a cup and holding it there for 10 seconds, but we used a bigger cup. And I also held the tissue on with a rubber band so it was easier for the kids.

Then they painted the bottom with regular light blue tempera paint.
I really wish I had enough blue watercolor paint for the whole class, because Gail used plastic wrap to make it look like ice, and it definitely didn't work with liquid tempera paint. So we blotted it with a scrunched up napkin,
which looked fine when wet, but didn't look much different when dry. So if you have watercolors or tempera discs, use those because it is awesome! (Seriously, go look at Gail's pictures!)
When the paper was dry, the kids glued on the polar bears. Instead of using a stencil and painting them on, I cut out several bears (and baby cubs!) for the kids to use. They made eyes and noses with a black Sharpie.

I really wish I went with a darker blue and purple because they ended up drying much lighter. But honestly, next time I'll spring for the watercolors!


Tuesday, January 15, 2013

Polar Bear Silhouettes

Today we learned about the polar bear. My art project idea changed several times throughout the day. My original idea was to place a template of a bear on white paper and have the kids spray different colors of paint over it, then remove the template to reveal a white bear. But after only finding one spray bottle, I decided to have the kids paint their papers with watercolors. I tried my best to explain the northern lights to them, but it's a pretty hard concept to understand! I told them to paint streaks of color on their paper.
 
Then I had a bunch of white cut-outs of polar bears. (I just did a google search for polar bear silhouettes and used a few as my templates.) But when I held up the white bears on the paper, it was hard to see the outline, especially if the child didn't paint their entire paper. You would think I would have checked this after cutting out one bear, but no. I had cut out about 15 bears. So I scratched that and decided to do black. After all, the northern lights come out at night and so the bears wouldn't look white anyway! Then I was going to have the kids rip black paper up to make the ground, but the torn look just wasn't doing it for me. It looked like mountains instead of snow or ice. So I straightened them out a bit with a scissors.
Finally, the kids glued on the bear silhouettes, which I re-cut in black. (Thank goodness for nap time!) There was enough room for one big bear and one little bear.

I hung them in the window so the sun can shine through the northern lights. They are much prettier than these pictures show.
 
 
Fun Fact: Humans are polar bears only predator.

Monday, January 9, 2012

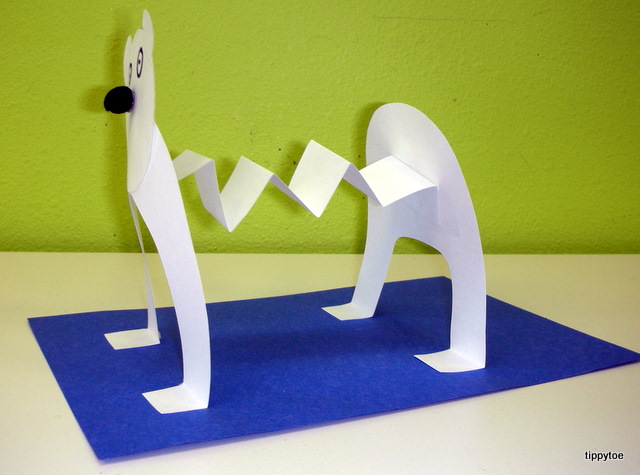
Standing Polar Bears

I'm so excited to be teaching about Polar animals this week! I've been waiting for this unit since I started working at my new center. I love teaching about any kind of animal, but polar ones are pretty much at the top of my list. Our first animal was the polar bear!
I saw this craft in an Oriental Trading magazine one year. It was made out of craft foam, but I thought it could easily be done with construction paper. I started by drawing two sets of legs.
The back set is the wider one on the right. I also folded the bottoms of them to make feet. Then I cut out small circles for heads and tiny ears. The kids used a black marker to draw the eyes and mouth and we used glue dots to stick on a black pom pom for a nose.
Then they glued the head to the front set of legs. We used another glue dot to stick on a white pom pom to the back set of legs for a tail.
I cut a blue piece of construction paper in half and the kids glued down the feet of the polar bear, first the front set, then the back set about 4 or 5 inches away.
I used a piece of tape to attach an accordion-folded strip of white paper to both sets of legs. I'm sure glue would work as well.
And then it stood up all by itself!

So cute, right?


Fun Fact: A polar bear's fur may appear white, but it's actually transparent hollow tubes! They look white because they are reflecting the light. They trap the sun's heat and keep the bear warm.