Tuesday, May 28, 2013

Drawing in Paint with Q-tips

We have these foam rollers with which the kids love to paint. I decided to add to it by putting out Q-tips. First the kids rolled paint onto their paper. (We used card stock.)

Then they took a Q-tip and drew a picture in the paint.

The paint dried pretty quickly, so they had to draw fast. When the Q-tip got too full of paint it didn't work as well, so the kids flipped it over to use the other end. They really seemed to enjoy "drawing" with something different.


It even looked cool with just some scribbles.
When the kids were doing this, it reminded me of pyramid drawings, so I think I will have to add this to my Ancient Egypt unit!

Wednesday, May 22, 2013

Paper Plate Butterflies

Today was all about butterflies! I ordered caterpillars from Insect Lore and they are now in their chrysalids. (You can read about the last time I used this kit in my classroom here.) We are eagerly waiting for them to emerge as butterflies. Unfortunately, I think this will happen over the holiday weekend. Boo. In the meantime, we made our own butterflies with mini paper plates.
One table was set up to make the wings. The kids painted the paper plates with watercolors.
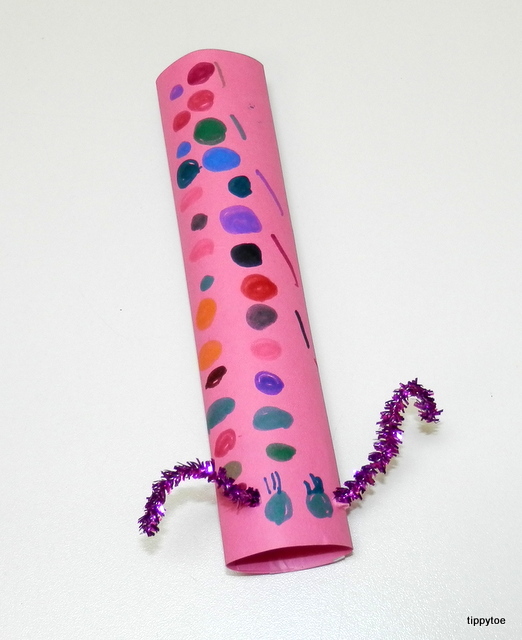
The other table was for the body of the butterfly. I took colored card stock and cut it into fourths. Then I rolled them up and taped them closed. (My stapler didn't fit in the hole.) I also used the scissors to make two small holes on one end for the antennae.
I put out a bunch of these with sparkly pipe cleaners and markers.
The kids put a pipe cleaner through the holes of the rolled paper.

Then they used the markers to make eyes. (And some kids even made decorations on the body.)
When the plates were dry, I cut them in half and shaped them a little to make them look like wings.
I stapled the wings together and used masking tape to attach them to the body. I tried using glue dots, but the plates weren't sticking very well. The tape worked fine as long as the kids didn't pull on the wings. And if they did and the wings came off, it was easy to reattach them. In fact, I mentioned that without the wings, it looked like a caterpillar. So then the kids started playing with them first as caterpillars and then added the wings to turn them into butterflies! I think they look so colorful sitting on the table in a big group.
And here are the kids making their butterflies fly!
You could use them as finger puppets, too!
 
Fun Fact: Butterflies taste with their feet!


Monday, May 20, 2013

Caterpillar Cuties

We are studying the life cycle of a butterfly this week. Last week I brought in caterpillars from Insect Lore and when we showed up to school this morning, they were all in their chrysalises! Today I taught the children all about caterpillars and then we did an easy art project.
 We used Dixie cups to make circle prints on our paper.

I think K-cups would be better because the smaller size would have allowed us to make more prints. But I didn't have any, so Dixie cups it was. I reminded the kids to make sure all their circle prints touched so their caterpillars wouldn't lose any body parts! Once the paint was dry, we used makers to add facial features and legs and anything else we wanted.
They turned out very cute!


This next one has "fake eyes" on all it's body parts to scare away predators (according to the boy who drew it)!

Fun Fact: Caterpillars have 12 eyes.

Monday, May 13, 2013

Handprint Carrots/Footprint Flowers

We are talking about vegetable gardens this week, and today we made carrots with our handprints!
We dipped the sides of our hands in orange paint to make the carrots,

and dipped our fingertips in green paint to make the tops of the carrots.
It was a very simple project!
If they wanted to, when the paint was dry the kids could make a brown line across the carrots to show that the orange part grows in the dirt and the green park sticks out above the dirt.
And one more quick thing I wanted to show you, completely unrelated. Here is the Mother's Day project I made for my mom with my daughter's help.
It says "The only thing better than having you for a mom is my daughter having you for a grandma." It's a quote I've seen all over Pinterest. I used Elise's footprints to make the flowers and just quickly drew in stems and grass with a marker, although I wish I had used paint. It turned out very cute!

Thursday, May 9, 2013

Mother's Day/Teacher Appreciation

Just wanted to show you what we made for Mother's Day this year. I had the kids draw a picture of their moms.
Then I "framed" them by taping them to a slightly bigger piece of colored construction paper. I also asked each child to finish the sentence, "My mom is..." and I wrote their answer on the frame.


Didn't they do a great job? We also made cards. I let the kids paint their own hand any way they wanted.
Then they made the print on the front of a card. I printed out a poem on colored paper. This is the one I used:
Sticky fingers and big wet kisses
Dirty toes and stars with wishes
Splashing through puddles and hugs too tight
Afternoon naps and sleepless nights
I’m getting so big and I’ll soon be grown
So I’ve made this handprint for your very own
Tuck it away and keep it, please
So years from now I can see
How much I’ve changed as time went by
And you can always remember my…

Sticky fingers and big wet kisses
Dirty toes and stars with wishes…
The kids glued the first part of the poem on the front of the card and the last two lines on the inside of the card. Then they decorated it.


I'm not sure what that's a picture of, but it cracked me up when I saw it!

And I wanted to share what I made for my daughter's teachers for Teacher Appreciation Week. It was her first week in day care, but I couldn't resist putting something together. It was very simple. I bought some baby food jars and cleaned them out. Then I filled them with M&Ms (plain and pretzel). I made a label that said, "You are a Marvelous and Magnificent teacher! Thanks for being my M&M!"
I got that idea from Mommy's Kitchen. She had a whole poem, but I just used the last part. I also covered the tops with some scrapbook paper.
You could also use mason jars, but I thought the baby food jars were cute, since they are infant teachers.
Happy Mother's Day to all the moms out there, and Happy Teacher Appreciation Week to all the teachers out there!!

Monday, May 6, 2013

Arm Cuff Bugs

What?! Yep, that's what they are. Arm cuff bugs.
Or you could call them bracelets since my kids just wore them on their wrists. I got the idea to use toilet paper rolls for the insect legs from Homemade Mamma. First you cut it the long way to open it up, then cut it in half the other way. Then cut 3 slits in each side for the legs.
I put out construction paper and the kids were able to cut their own bug parts. Then they glued them to the legs.

So creative, these kids, I tell ya!