Today's Eric Carle book was
The Mixed-Up Chameleon. After teaching the kids about chameleons (like how they actually change color according to their mood or temperature, not to hide!), I read the story and we got to work on our craft.
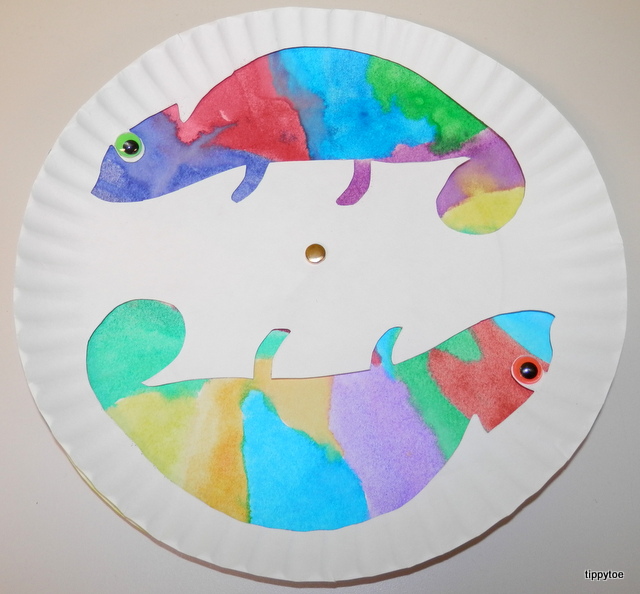
When I made my example (above), I cut out two chameleons. But when I prepared the craft for the kids, I only cut one out. I traced a chameleon template (from a coloring sheet I found) onto a paper plate.
I left little spots on the head so they would have some place to attach the neon wiggle eye. The kids took another paper plate and painted it with watercolors.
I really like all the colors blending together. I was tempted to have them "paint" the plate with just water first, and then go over it with watercolors, but I didn't.
Once it was dry, I found the center of the plates, used a scissors to poke a hole, and used a brass fastener to attach the chameleon plate on top of the painted plate.
Then the kids could turn the plate to make their chameleon change colors!
I didn't think it was a big deal if I just eyeballed the center of the plate, but if you are a perfectionist you might want to measure. If the fastener isn't in the exact center of the plate, when you spin the plates you will get this:
Eventually the plates won't be lined up anymore. It didn't bother me or the kids, though. I'm glad I left a spot for the eye. I only wish I could have made the tail look more like it was curled up instead of just a ball, but I didn't know how.
Fun Fact: A chameleon's tongue is often as long as its body!


15 comments:
Love this! Simple and very cool. Definitely pinning this for later
I m a primary school teacher in belgium and i lovethis idea!
Thanks for sharing
I m sure my kids will love it!
This is a fantastic and innovative idea.
The kids will love this!
Eeps! I love this and am sooo doing it with my threes! Thank you for sharing. Seriously cool.
How did you cut the chameleon shape out? I love this craft, but I'm having a hard time figuring out how to do this for multiple kids quick enough! Any tips? Thanks for the great idea!
Kelsey, you definitely have to prepare this craft ahead of time. Depending on the number of kids, you could cut them out while they paint the other plate. The paint has to be completely dry before you put the top plate on, so that gives you a little more time as well. As far as cutting it out, I made a slit across the body of the chameleon so I could get my scissors in there easier. Or you could cut through the edge of the plate and tape it later. And I used a small, but sharp, scissors to cut around the feet and tail. Good luck! Any more questions, you can just e-mail me at tippytoecrafts@gmail.com.
I did this today and it was so much fun. It was the quietest I had my students in a long time.
Thanks for sharing
S. Dixon
TX
Glad you enjoyed it, Stacy!
love love love this, super cute
Very cool idea. Thank you!
I cut out the one side at home. Voluntold my young adult son. :) As the side they painted is drying I gave them the one I cut out and they colored that one with markers or crayons and glued it on the opposite side of the cut out chameleon. So it gave them something to do, it stayed in place so was a bit different, plus gave a little time for the painted side to dry.
Thank you!
Amy
I'm the Editor of Fun Family Crafts and wanted to let you know that we have featured your chameleon project! You can see it here:
https://funfamilycrafts.com/colorful-chameleon/
If you have other kid-friendly craft tutorials, we'd love for you to submit them. Thanks for a great project idea!
I loved this craft! We actually spray painted the top plate black to make our colours stand out even more. We loved the result!
Amanda, painting the top plate black sounds like a fantastic idea! I'm glad you enjoyed it!
Wow! This is so creative and entertaining! Thanks a lot for sharing. Pilar
Post a Comment