Showing posts with label flowers. Show all posts

Sunday, April 10, 2016

Two Cherry Blossom Crafts

I've been waiting to do this craft since the fall. I had bought a pack of foam tree cut-outs from Target and it came with some brown ones and some green ones. My daughter made a fall tree with buttons (read about that here).
But I thought the green tree would be perfect for cherry blossoms! First we glued the tree to a piece of blue paper. Then my daughter scrunched up pink tissue paper squares, dipped them in glue, and added them to the tree.

She put some on the foam tree and some on the paper around the tree.
I also had these self-adhesive butterfly jewels that I received from CraftProjectIdeas.com so I let her add some to her paper.

I love how the green and pink look together!
I also made cherry blossoms with the kids I care for. I painted their hands and arms brown to make a tree and they put scrunched up tissue paper on that.

They turned out very cute!


Friday, May 15, 2015

Handprint Flower Garden

I have a very special display to share with you this evening. When I first had the idea it was just going to be another bulletin board or door display, but it's turned into so much more. I started out by having the kids in my class make handprint flowers on a huge sheet of white paper.
Yes, I only had three kids that day. I have an extremely small class right now. So I decided to get the handprints of the 3-year-olds across the hall from me. I also painted in some grass at the bottom.
Then I thought I might as well get the handprints of the kids from other classes, too. So the 2-year-olds added theirs, and then the 5-year-olds.
In the picture above, some of the stems hadn't been painted in yet. All the kids made their own stems except for the 2-year-olds, which were painted by one of my 4-year-olds or me. And the kids had to get a little creative with their stems because they had to avoid painting over someone's handprint! I wish I could have gotten prints from the infants and toddlers, but it would have been too tricky. If I had thought of it before I started, I would've done their prints first and made the white paper much bigger. But I still love how it turned out. I titled the display, "Love Grows Here" and hung it at the end of a long hallway.
I wrote each child's name next to their handprint using a marker of the same color so it kind of blended in.
I even got my daughter's handprint. She moved up to the 2-year-old room about a month ago and hers is the smallest flower. It's so cute!
Now, the reason why this display is extra special is because our center is going to be changing ownership in a couple weeks. The current owner cried when she saw this in the hallway. It reminds everyone that we are still a family, no matter what. Even if we all end up going our separate ways. Our center is filled with love.

Thursday, April 2, 2015

Peeking Bunnies and More

Here are some more of our Easter and Spring crafts that we worked on this week. The first is the peeking bunny.
I've seen this craft many places online, but I wanted each child's to be a little more unique so instead of gluing pre-cut pieces, I had the kids paint their own bunny head and ears by dipping pom poms into paint.
Then they dipped a smaller pom pom into pink paint for the inside of the ears and the nose.
When it was dry, they drew in whiskers, eyes and a mouth. I also hot-glued a jelly bean to the nose. Then they painted their fingers green and made prints for the grass.

So simple, and each one is different. I hung them up with our Easter wreaths.
We also made egg chicks. I did this a few years ago, but this time I had the kids do more of the work themselves. I provided the egg-shaped body and the kids cut out everything else. They could do whatever they wanted to turn their egg into a chick.


Love how unique they are! Our last art project was fork tulips, which I first saw at Kids Play Box. I added a little bit of white paint to different colors and the kids pressed a plastic fork into the paint. They had to roll it back and forth a bit in the paint and again when they made their prints.

Most kids made all their tulips first, then added the stems with a brush, but some made a few tulips, added stems, made more tulips, added more stems, etc... They turned out so beautiful!

This will definitely be a project I do every year from now on. They add so much color to my room!
We also did an alphabet matching activity using plastic eggs. I wrote uppercase letters on the top halves and lowercase letters on the bottom halves. The kids had to match the letters together.
I made it a little easier on them by having the top and bottom be the same color.
Once all 26 eggs were put back together, they got a jelly bean! And the neat part was I was able to use a permanent marker to make the letters, but after the activity I just scribbled over them with a dry erase marker and wiped it clean with a tissue! Now I can easily use the eggs for something else.

Happy Easter!

Wednesday, May 7, 2014

Mother's Day Flowers

Here's a short and sweet post about what the kids made their moms for Mother's Day.
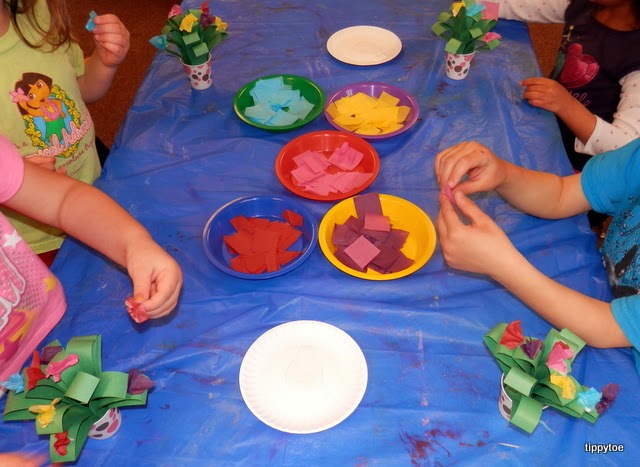
I got the idea for the paper flowers from Crafts For All Seasons. Please visit that site for the directions. She called it a paper bouquet, but I think it looks more like a potted plant. Either way, it is very easy to make and they turned out great. The kids did all the cutting themselves. And instead of putting glue on each green stem, the kids dipped the tissue paper into the glue and then attached them to the stems. They could also use several different colors of tissue paper.
They look so pretty! I only wish they smelled pretty, too.
For the card, I used stencils to trace the word MOM and made sure the letters were all touching. Then I shrunk it down so it would fit on a regular piece of card stock. I traced the word so the top was touching the fold of the paper and then cut them out. I decided not to cut the middle out of the O, and just used a marker to draw it. Although I do think it would be cute if it was cut out and had a picture of the child showing through. The kids wrote their name on the inside and drew some pictures or wrote "I love you."
Then they flipped it over and decorated the front with all kinds of sequins. They used a toothpick to apply glue to the card, then put on the sequins.
And they all loved it when I pointed out that when their card was open, MOM turned into WOW! ;o) Tomorrow I will put the flowers and cards into colored paper lunch bags to send home for Mother's Day!

Monday, May 5, 2014

Cupcake Liner Flowers

I found a package of brightly colored cupcake liners at the store and I couldn't resist buying them. I knew they would be perfect for an art project. So today the kids turned those liners into beautiful flowers. I folded all the liners in half 3 times. (The liners were white on the inside, so I flattened them out and then folded them with the color on the inside.)
The kids held on to the pointy end and cut a design into the other end. They could snip off the sides or cut a wavy line or cut triangles into it -- whatever they wanted.
When they opened them up they were amazed at their creations! After they cut the liners, they glued green stems onto blue construction paper. (I had cut a bunch of stems out ahead of time, but I also put green paper on the table in case anyone wanted to cut their own stems.) Then they glued the middle of the liner on top of their stem.
They made sure to glue down the white side, and only the middle so the "petals" of the flower would stick out. Then they added leaves. Again, I cut a bunch out but the kids were welcome to cut their own.
Finally, they used white glue to add a pink or purple button to the middle of the flower.


They turned out BEAUTIFULLY! I just love them! Some kids chose to cut the pointy end of the folded cupcake liner so they had a hole in the middle of their flower. Still pretty!
These really brighten up our room and I'm excited to do more flower crafts later this week!