Showing posts with label spiders. Show all posts

Monday, October 12, 2015

Sparkly Spider Webs

I found these jeweled spider rings at Target and I thought they'd be cute for a spider web craft. Plus I knew my daughter would love wearing them.
We used sturdy paper plates for this craft, but any thick paper would work. Start by making your web with Elmer's white glue.
Younger kids can just put a bunch of glue on their plate any way they'd like. Then shake on the glitter.

This is where the paper plate really came in handy. It helped contain the glitter. You can even shake it around on your plate to make sure all the glue gets covered.
Then quickly dump the excess glitter in the garbage or another container if you wish to save it. Now it's time to add your spiders! I cut off the ring parts of the spiders so they'd be flat on the plate. I also used glue dots, but regular glue is fine, too. Wait for the glue to dry and your sparkly spider web is complete!

I'm thinking of punching a hole in the top and putting string through so I can hang them somewhere. They're cute halloween decorations!

Wednesday, October 29, 2014

Full Moons, Spinning Ghosts and Creepy Spiders

I'm falling behind on my Halloween crafts, so I have to combine a few in one post. I'll try to keep it short! Back when we made scarecrow silhouettes, I had a hard time deciding if I wanted to make them with sunsets or full moons as the background. I finally realized that I should save the full moon for a Halloween craft. But this ended up being more of a fall craft. Anyway, I drew a big circle on white paper, making it the size of a coffee filter. Then I squirted white and yellow paint in the middle of it and the kids mixed it up and spread it around the circle.
 Then I placed a coffee filter right on top of it and the kids pressed down a bit.
(Sorry about the ghostly hands!) After only a minute or two, I peeled it off. This gave the moons a little texture, which didn't really show up on camera, but it was there! When they were dry I cut them out and glued them to a piece of black paper. The kids painted trees and hills and anything else they wanted onto their paper.
I had also used a stencil and cut out some bats, cats and owls for them to glue on.


The black paint made the moon curl up a bit, as well as the black paper itself.
I just used some double stick tape under the moon edges and then flattened the whole thing between two heavy filing containers.
Earlier in the week we made spinning ghosts to hang in our room. I drew a very simple ghost pattern onto white paper and gave it a long "tail." I cut out the ghost part because I knew that would be difficult for my kids to do themselves.
So all they had to do was cut out the rest of the tail and draw in a face on both sides.

Last week we made spider rings.
I got the idea from Fantastic Fun and Learning so go there for directions. We made the small ones and only used one pom pom. I hot glued the pom pom on, but the kids used tacky glue to add the wiggle eyes. They LOVED them!
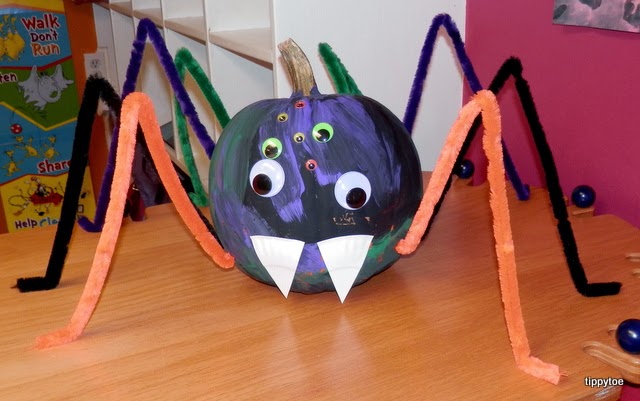
We also went on a field trip last week and picked out a pumpkin for our classroom. The kids painted it black, green and purple and then we made it into a spider. We glued on 8 wiggle eyes and two fangs cut from a small paper plate. I used large pipe cleaners for the legs and stuck them right into the pumpkin.
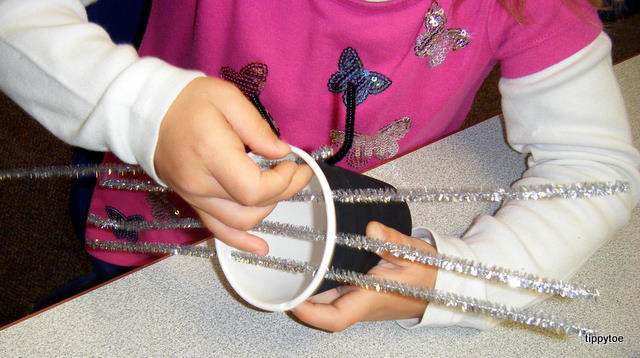
I must have been on a spider kick because over the weekend my daughter and I made a garbage bag spider. She was a really good helper when it came to filling the bags with leaves! I used electrical tape to tape the two bags together, glue dots to attach the wiggle eyes (I decided to just do 4 since not all spiders have 8 eyes), made the fangs from a paper plate again, and used JUMBO pipe cleaners for the legs. I used electrical tape to attach the legs as well. It now sits in the bare spot where all my roses used to be, waiting to greet trick-or-treaters!
I don't know if he's weather-proof, but luckily it's been a dry week and the legs are holding up just fine. I did use a few tent stakes to keep some of the legs in place, but even those without a stake are still standing. Yay!

Monday, October 28, 2013

Webs with Hanging Spiders


We did this craft a couple weeks ago, but I haven't gotten around to sharing it until now. It's a simple glitter spider web with a little surprise hanging from it. Before beginning this project, we spent several minutes going over ways to make a spider web. One of the easiest is to make a cross, then an X, then a big circle, a little circle, and a small circle. We practiced it in the air with our fingers. Then I got out glue bottles and black construction paper. The kids did a great job remembering how to make a web!

I added a string to one corner of the spider web and squished it in the glue. Then I put them in a box (ones we use for marble painting) and the kids shook on the glitter. This was so the glitter didn't get all over the place.
I offered several colors of glitter and the kids could use as many or as few as they wanted. We had halloween colors: purple, green, silver, and two shades of orange. When they were dry, I tied a glow-in-the-dark spider ring to each string. They turned out really cool!


The kids can't wait until I send these home so they can cut the spider rings off and wear them!

Fun Fact: Although all spiders make silk, not all of them make webs.

Monday, October 21, 2013

Adorable Spiders

Yeah, that's right. Adorable spiders.
Told you! That's my little girl. I used her face on my example. I got this idea from Mrs. Butterfield's First Grade. The kids painted 2-inch styrofoam balls. I stuck toothpicks in them so they could have something to hold on to while they painted.
Then I stuck them in a big piece of cardboard to dry.
I took pictures of the kids sticking pipe cleaners in them, but they seem to have vanished. What I did was use a sharpie to make 8 dots, 4 on each side of the ball, and that's where the kids put the pipe cleaners. (Each leg was half of a pipe cleaner.) I had taken pictures of the kids making a "spider face," whatever that meant to them. Then I cut them out and used a glue dot to attach them to the styrofoam ball.
So cute! I considered having them add 6 wiggle eyes to their head, so the spider would have 8 eyes, but I liked them too much as is.
I hung them from the lights by sticking paper clips into them.

Ain't she sweet? Love that look she's giving me. And speaking of my daughter, here is a pumpkin baby she gave to her day care teacher:
I got the idea from a Family Fun magazine. I found a small pumpkin with a long curly stem. I used a sharpie to draw the eyes and tied a ribbon on the stem.
I cut the nipple off a pacifier and used hot glue to attach it to the pumpkin.
(Thanks to my honey for taking those fancy photos!)
I had to snap a quick photo of Elise with the pumpkin before we left this morning.
I might have to make another one to keep here at home!

Saturday, October 29, 2011

Spider Cups

So I thought it would be easy to find black paper cups this time of year, but no. Every store just sold the big plastic ones with ridges. Then I looked for any solid-color paper cups. Still nothing. So I ended up buying some monster cups from the birthday party section at Target and painted them black. It took two coats of paint, but went fairly quickly.
Then I poked eight holes near the top of the cup (which would actually be the bottom since they will be used upside down), four on each side. I also poked two holes a little further up near the front of the cup. You'll be able to see that in a bit. I set out some black pipe cleaners (cut into smaller pieces) and wiggle eyes that were stuck on glue dots. I also cut some triangles out of red and white paper and put those on glue dots as well.
First you take the black pipe cleaner and string it through the two holes near the front of the cup.

Those are the spider's pedipalps. Then we used silver pipe cleaners for the legs by stringing them through the remaining eight holes, using 4 whole pipe cleaners.
You just go in one side and out the other. Then the kids used a metallic Sharpie to draw a mouth and then stuck on the eyes and fangs. The glue dots worked great! Then they bent the pipe cleaners into legs.
If you bend them just right, you can actually get the cup to be up off the table. We sure did have some creepy crawlies!
In the past, I've spent an entire week teaching about spiders. I love my spider theme. But at my new center, I don't get to choose my themes. (Boo.) So I just taught some basic spider facts during one day of my Halloween theme. I used this amazing book:
It's by Nic Bishop. It has the coolest close-up pictures of spiders I've ever seen! Look at those fangs! And it's filled with great information. I also read this book:
"'Will you walk into my parlor?' said the spider to the fly." Ooh, I love it! It's by Tony DiTerlizzi, but it's based on the famous cautionary tale by Mary Howitt. If you haven't read it, go get it!

Fun Fact: Spiders have pale blue blood!

10-18-12 UPDATE: We made these again this year (although I found and bought black paper cups!) but used colored glitter pipe cleaners. I love the added color!