Showing posts with label spring. Show all posts

Thursday, April 13, 2017

Silhouette Bunny Art

Here's a fun and easy Easter project for the kids to do! Cut out a bunny shape and tape it to white paper. Use Do-a-Dot markers to stamp around the bunny, making sure to overlap onto the bunny's edges. Feel free to add some dots "floating free" around the bunny as well.
Peel off the black bunny and you are left with a beautiful bunny silhouette!
I only taped the black paper in two spots so it would be easy to take off, but that means some of the ink got under it. Maybe using a thicker paper would help. I used black construction paper and white cardstock paper. When I had some kids do this project I had to remind them to make dots all around the bunny shape so you can see an outline when you take the black paper away.

They did a good job, but I helped them fill it in a little.


Quick and cute!

Wednesday, March 29, 2017

Marble-Painted Bunnies

These adorable bunnies will definitely add some Spring color to your home or classroom!
I traced my bunny template onto white cardstock and the kids marble-painted it with bright colors.
I used a colored marker to outline the bunny so when I cut it out it would have a border. But it also helped me see where to cut when the paper was covered in paint!
The kids picked out a little pom pom to glue on for the tail.

They would also look good glued onto another piece of paper, either a bright color or even black.
But I decided to leave them alone. I did, however, end up using the rest of the marble-painted paper because it was too pretty to throw away. I glued it onto another piece of paper and added a cotton ball for the tail. This way each child had 2 bunny crafts!


Just be sure to cut the bunny out carefully, only making one small cut on the bottom that can easily be hidden.

Sunday, April 10, 2016

Two Cherry Blossom Crafts

I've been waiting to do this craft since the fall. I had bought a pack of foam tree cut-outs from Target and it came with some brown ones and some green ones. My daughter made a fall tree with buttons (read about that here).
But I thought the green tree would be perfect for cherry blossoms! First we glued the tree to a piece of blue paper. Then my daughter scrunched up pink tissue paper squares, dipped them in glue, and added them to the tree.

She put some on the foam tree and some on the paper around the tree.
I also had these self-adhesive butterfly jewels that I received from CraftProjectIdeas.com so I let her add some to her paper.

I love how the green and pink look together!
I also made cherry blossoms with the kids I care for. I painted their hands and arms brown to make a tree and they put scrunched up tissue paper on that.

They turned out very cute!


Saturday, May 30, 2015

Handprint Butterfly Gift for Teachers

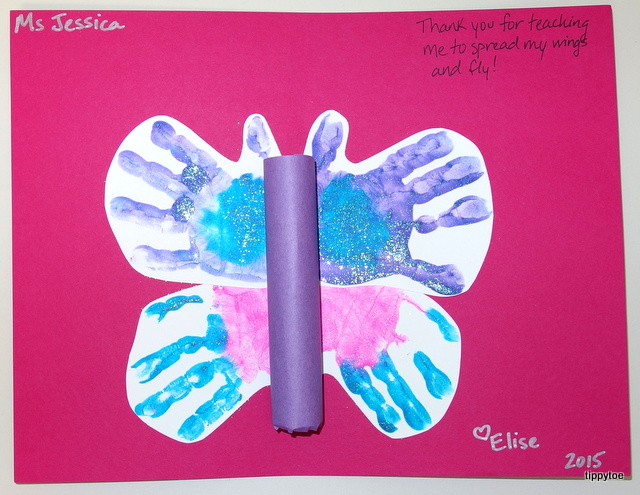
Yesterday was the last day of school for me and my daughter. I mentioned in my last post that my center was changing ownership at the end of the month. It's getting a new name with all new staff. It was quite an emotional day, to say the least. I wanted to give each and every one of my coworkers a little something to say thank you. I came up with this:
There's actually a little treat hidden inside, which I will get to later. I used glitter watercolor paint that is thicker than most watercolors. (I bought them on Amazon.) My original plan was to make one butterfly at a time on white paper. But after my first trial run, I realized that wouldn't work.
I had missing fingers or too many fingers or globs of paint in weird places. So then I decided to just have my daughter make a bunch of handprints that I would later cut out.
We made about 20 the first day and probably over 30 the next day. I had a few extras, but that's what I wanted so I could pick and choose the best ones. After cutting them out, I glued them to a piece of cardstock. For the body of the butterfly, I rolled up a pack of Rolos in colored paper and used double-stick tape to keep it closed. I did not tape the paper to the pack of Rolos.
Then I used double-stick tape to attach the roll to the middle of the butterfly, covering up the bottom thumbprints.
The top thumbprints became the butterfly's antennae. In one corner I wrote the teacher's name, in another corner I wrote my daughter's name and the year, and in another corner I wrote, "Thank you for teaching me to spread my wings and fly!"
The pack of Rolos easily slides out, and the butterfly body remains intact.
I scrunched the paper at the end of the body just a bit to hold the Rolos inside when the paper is held upright.

And after the teachers eat the treats, they still have a little keepsake from my daughter. I worked with a wonderful bunch of women and I will miss them greatly! They were not just coworkers, they are, and will always be, my family.

Friday, May 15, 2015

Handprint Flower Garden

I have a very special display to share with you this evening. When I first had the idea it was just going to be another bulletin board or door display, but it's turned into so much more. I started out by having the kids in my class make handprint flowers on a huge sheet of white paper.
Yes, I only had three kids that day. I have an extremely small class right now. So I decided to get the handprints of the 3-year-olds across the hall from me. I also painted in some grass at the bottom.
Then I thought I might as well get the handprints of the kids from other classes, too. So the 2-year-olds added theirs, and then the 5-year-olds.
In the picture above, some of the stems hadn't been painted in yet. All the kids made their own stems except for the 2-year-olds, which were painted by one of my 4-year-olds or me. And the kids had to get a little creative with their stems because they had to avoid painting over someone's handprint! I wish I could have gotten prints from the infants and toddlers, but it would have been too tricky. If I had thought of it before I started, I would've done their prints first and made the white paper much bigger. But I still love how it turned out. I titled the display, "Love Grows Here" and hung it at the end of a long hallway.
I wrote each child's name next to their handprint using a marker of the same color so it kind of blended in.
I even got my daughter's handprint. She moved up to the 2-year-old room about a month ago and hers is the smallest flower. It's so cute!
Now, the reason why this display is extra special is because our center is going to be changing ownership in a couple weeks. The current owner cried when she saw this in the hallway. It reminds everyone that we are still a family, no matter what. Even if we all end up going our separate ways. Our center is filled with love.

Thursday, April 16, 2015

Angry Tornadoes

We had a state-wide tornado drill today so I thought it would be a good idea to share a tornado craft my class made last week.
Way back in February when I was looking for ideas for a Valentine's Day display, I found the perfect one at Life in First Grade. I ended up using her idea for my display, but I also liked the tornado craft her kids did. I changed it up a bit when my kids made them for our weather unit. On their paper I squirted a little bit of black paint and a little bit of white paint and they mixed it together with their fingers.
Once it became a gray color, they continued swirling it around, but also dragged the paint down.

If needed, they'd go back up and drag some more paint down, all the while swirling their fingers.
They also made two arms that extended out from the sides. When it was dry, they glued on wiggle eyes and black fists (heart-shaped pieces cut from black paper). Then they used a Sharpie to draw in angry eyebrows and a mouth.

Some looked mean, some looked funny,
but they all looked cute!