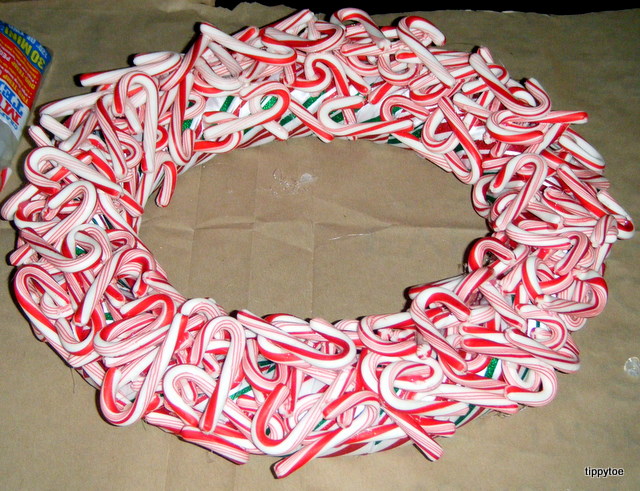
Even though it's been raining here, I'm trying really hard to get in the Christmas spirit. So I'm here to share with you a candy cane wreath. I had seen several candy wreaths online that I liked (here and here), but my inspiration was from here. I used a foam wreath from Michaels, some Christmas ribbon, a whole bunch of mini candy canes and some Christmas ball thingys (I don't really know what they were). I wrapped the ribbon around the wreath so I wouldn't have to worry if it showed through gaps in the candy canes. Then I began hot gluing the candy canes all over, in every direction.
I kept going with the candy canes until I was happy with the coverage. I had originally bought two boxes of candy canes, but then the next day I sent my husband out to get two more boxes because I was worried I wouldn't have enough. But I ended up using less than one of those, so total I used about 2-and-a-half boxes.
I glued some candy canes to the sides of the wreath, but not too far down.
Then I made a bow with the same ribbon (with the help of my Bowdabra). I also started gluing on red and green ornament things.
They were in a clump so I had to cut them apart. I really have no idea what they are supposed to be for, but they worked perfectly for this. I used mostly red with only a few green. Then I glued on the bow.
I gave this to my mom, but because it's made of candy I don't think it can be stored and brought out again every Christmas. Anyone ever try storing a candy wreath before?
**Linking up to Centsational Girl!**
Saturday, December 3, 2011
I Got An Award!
Carrie at Crafty Moms Share gave me the Liebster Blog Award!
She actually gave it to me several days ago, but I'm just now getting around to blogging about it!The goal of the award is to spotlight up-and-coming blogs with less than 200 followers. The rules are:
- copy and paste the award on your blog
- thank the giver and link back to them
- reveal your top 5 picks and let them know by leaving a comment on their blog
- hope that your followers will spread the love to other bloggers
I hope you will check them out! Thanks for your support, Carrie!
Friday, December 2, 2011
Handy Hermit Crabs
Then I had them draw an underwater scene on light blue paper using oil pastels.
I reminded them that their crabs would cover much of the paper so they should decorate the sides and top and bottom of the paper. I used small pieces of pipe cleaners for the eye stalks and just attached them to the hand prints with masking tape. Then I used glue dots to attach the wiggle eyes to the eye stalks. The plate was glued down with Elmer's glue along the ridge of the plate, and the hand was taped in place.
I love how they turned out! I displayed them on the wall in our room and all afternoon I couldn't stop staring at them. They are just so stinkin' cute!
I was also thinking it would be neat to some how have the hand print inside the shell and be able to pull it out. Maybe next time.
UPDATED 11/19/14:
We made these again this year and they are just too cute not to share. I traced the kids' hands this time instead of making a print. And we used Crayola watercolors to paint the plate (instead of generic paints that we used above) and they turned out so much brighter!
Fun Fact: Hermit crabs are not really hermits. They are social creatures and can usually be found in groups of 100 or more.
Wednesday, November 30, 2011
Grouchy Ladybugs
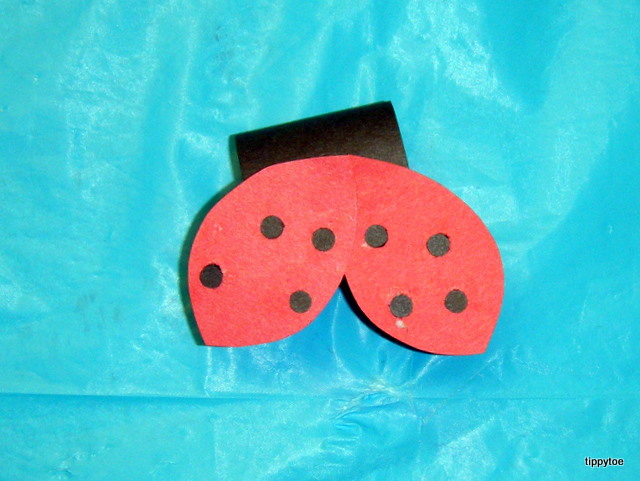
Today we read Eric Carle's The Grouchy Ladybug. I taught the kids all about these tiny beetles and then we got to work on making some. I got my idea from here, but I changed it a bit. We started with these materials:
Rolled up strips of black paper, wiggle eyes on glue dots, wings,
black dots (that I made with a hole punch), and heads that were oval and had a small accordion-folded strip on them.
First, the kids glued the dots to the wings. (Actually, those are the elytra, which protect the ladybug's flight wings, but I'll just refer to them as wings for this post. Whenever I teach the kids about animals, I always try to use correct terms.)
Then they glued the wings onto the rolled up body.
Next, they added some wiggle eyes to the head and glued the accordion strip to the body.
Then I poked two holes in the head and used black pipe cleaners (cut small) for antennae. I slid the pipe cleaner through the hole,
then twisted the ends together and bent the tip over.
Sadly, those pipe cleaners were a little too heavy for most of our heads and they needed some more gluing to stay up. It would have been cute if the heads were able to stay afloat, but this was the best I could do:
To tie this in to the story, I asked the kids what made them grouchy and wrote it on the bottom of a leaf.
Then I stapled the ladybug to the leaf.
Next time I will just use paper antennae so the heads can be bouncy. I don't know why they need to be bouncy, but they sure were cute that way!
Fun Fact: The elytra on a ladybug are always mirror images of each other.
**Linking up to Crafty Moms Share!**
Rolled up strips of black paper, wiggle eyes on glue dots, wings,
black dots (that I made with a hole punch), and heads that were oval and had a small accordion-folded strip on them.
First, the kids glued the dots to the wings. (Actually, those are the elytra, which protect the ladybug's flight wings, but I'll just refer to them as wings for this post. Whenever I teach the kids about animals, I always try to use correct terms.)
Then they glued the wings onto the rolled up body.
Next, they added some wiggle eyes to the head and glued the accordion strip to the body.
Then I poked two holes in the head and used black pipe cleaners (cut small) for antennae. I slid the pipe cleaner through the hole,
then twisted the ends together and bent the tip over.
Sadly, those pipe cleaners were a little too heavy for most of our heads and they needed some more gluing to stay up. It would have been cute if the heads were able to stay afloat, but this was the best I could do:
To tie this in to the story, I asked the kids what made them grouchy and wrote it on the bottom of a leaf.
Then I stapled the ladybug to the leaf.
Next time I will just use paper antennae so the heads can be bouncy. I don't know why they need to be bouncy, but they sure were cute that way!
Fun Fact: The elytra on a ladybug are always mirror images of each other.
**Linking up to Crafty Moms Share!**
Tuesday, November 29, 2011
Push-Paint Creations
We read Brown Bear, Brown Bear, What Do You See? today. I know it isn't written by Eric Carle, but he illustrated it so I included it in our lesson this week. To go along with the story, we made push-paint art. The kids took a creased piece of paper and put a few globs of paint near the center.
Then they folded the paper and pushed the paint around. When they opened the paper back up, there was a beautiful work of art.
So I asked the kids, "What do you see?" I encouraged them to look at their painting from all angles and then I wrote their answers on the paper, adding "looking at me."
I had printed this out on my computer:
And I displayed the art around it.
I borrowed this activity from my former co-teacher. Thank you, Miss Sara!
**If you liked this, check out our push-paint monsters!**
Then they folded the paper and pushed the paint around. When they opened the paper back up, there was a beautiful work of art.
So I asked the kids, "What do you see?" I encouraged them to look at their painting from all angles and then I wrote their answers on the paper, adding "looking at me."
I had printed this out on my computer:
And I displayed the art around it.
I borrowed this activity from my former co-teacher. Thank you, Miss Sara!
**If you liked this, check out our push-paint monsters!**
Monday, November 28, 2011
Seahorse Suncatchers
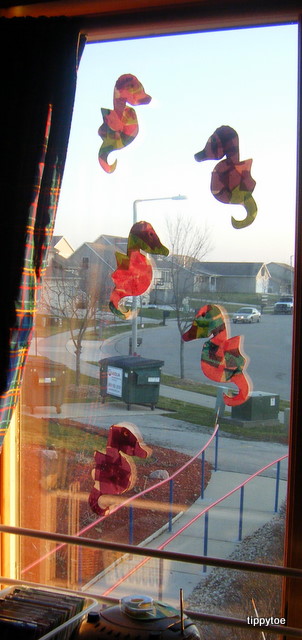
Check out these beauties:
Wanna know how we made them? Ok! But first a little background. We are reading Eric Carle books this week and today's book was Mister Seahorse. After reading the story I taught the kids all about seahorses. Then we made suncatchers using the same method we used for the stained glass apples. I put out seahorses that I had traced onto white paper and bowls of tissue paper squares and triangles.
I also put out watered-down glue with paint brushes. The kids painted the seahorses with the glue.
Then they added tissue squares.
Then they painted another layer of glue on top of the tissue squares.
I decided I wanted these seahorses to have a little sparkle, so I got out my mini salt and pepper shakers filled with glitter.
I love these things. Only a little bit of glitter comes out with each shake. They are perfect for projects that only need a dash of sparkle. The kids shook the shakers over the tissue squares and, because of the top layer of glue, the glitter stuck.
Then they added a fluorescent wiggle eye.
I'll tell you right now, that watered-down glue was not enough to keep the eye on. After they dried and I was cutting them out, almost every single eye popped off. But a drop of Elmer's was all it took to make them stick. Didn't these turn out beautifully?
I hung them in the window just as the sun was beginning to go down (around 4:00, sadly) and it was hitting the window juuuust right, and I think I finally got a good picture of a suncatcher.
Ahhhhhhhhh.....
Fun Fact: Seahorses, the slowest moving fish, do not have stomachs. Because food passes through their digestive systems so quickly, they need to eat constantly in order to stay alive.
**Linking up to Crafty Moms Share and I Can Teach My Child!**
Subscribe to:
Posts (Atom)