Tuesday, November 22, 2011

Handprint Mayflowers

I found this adorable Thanksgiving craft here and changed it up a bit. First I got a brown handprint from all the kids as they were dropped off in the morning. I wanted the paint to be dry by the time we did the art project. I used light blue construction paper and told the kids to spread their fingers as far apart as they could.
Then I made little white sails for the kids to glue on three of the fingers.
For the sea, they tore strips of dark blue construction paper and glued it under their hand.
And they also tore up white paper to make clouds.
Then I wrote The Mayflower in dotted lines for the kids to trace.
That way there was no question as to what ship this was.


So cute, right? Happy Thanksgiving!!

Sunday, November 20, 2011

YAH: Clay Pot Pilgrim Hats

I have another Young-at-Heart craft to share with you! My mom asked me if I'd make nut cups for Thanksgiving this year. I was very excited about this and started searching online right away for ideas. I came across some pilgrim hats made out of cups or flower pots. I thought that would be perfect! They can be decoration at first, but when you flip them over they become nut cups! So I bought two different sizes of clay pots. I got the 2-and-a-half inch pots for the adults and kids, and tiny ones for the babies (just because they were so cute). I also got silver glitter craft foam (for the buckle), black poster board (for the brim), and matte black spray paint.
I wanted to cover the holes in the bottom of the pots, so I cut out small circles from the poster board and glued them to the pots.
Then I took them out to the garage and spray painted them. I gave them two coats.
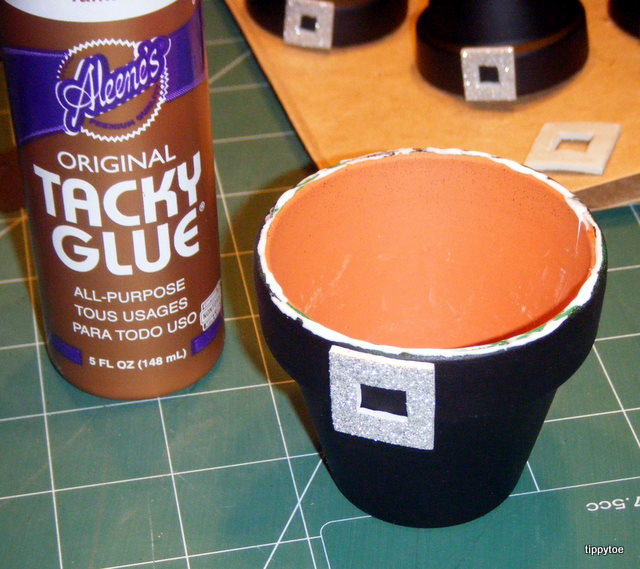
If I only had a few to make, I probably would have just painted them with a brush, but I had to make 20 so this was much faster. Once dry, I got to work on the buckle. I made a template out of poster board. I just made a square and cut out a smaller square from the middle. Then I traced that on the back of the glitter craft foam.
I also made a smaller version for the tiny pots. I used a scissors to cut the big square, but used an X-acto knife to cut out the middle square. This was a big pain in the you-know-what. No matter how carefully I traced and cut, each buckle was a different size/width and not straight at all. After awhile I just cut the big square, then folded the foam piece in half and used the scissors to cut out the smaller square. That was much faster and gave the same results (crooked, all different sizes) so I just stuck with that. Hey, if it's going to turn out the same, why not do it the faster way?
I really had to force myself not to worry about how imperfect they were. It was tough! Anyway, I used mini glue dots cut in half to glue them on the pots. (This was after trying to use craft glue. I didn't like that because the buckles slid around too much and I had to hold them on for a very long time. Glue dots worked like a charm.)
Is it starting to look like a pilgrim hat? Or a witch hat? Then I made a template out of poster board for the brim. I traced a mug for this, but because I'm using them as nut cups I needed another circle to be cut out of the inside. I traced a dixie cup for that.
It overlapped the clay pot rim just a bit, which was nice because then it would cover up the messy paint area.
I used a toothpick to put craft glue on the rim of the pot.
Then I attached the poster board to the rim. I made a smaller version for the tiny pots. I really like how they turned out. I think different colored glitter foam would have been a nice touch, but I didn't want to run back to the store.
Then, when it's time to fill them, flip them over and add dixie cups to the big pots and paper nut cups to the little ones.
I had thought about putting names on them with a metallic sharpie, and then using them as place cards as well, but different people are at Thanksgiving dinner every year and the babies this year won't be babies next year, so I left them plain. Although, using a chalkboard paint and chalk would solve that problem.

BEHIND THE SCENES:
I originally was going to make three different sizes of pilgrim hats. The biggest for the adults, medium for the kids, and tiny for the babies.
Here's what happened right before I took that picture:
Pretty little Duma always looking for food. Anyway, after noticing that my dixie cups fit perfectly in the medium pots, I thought the big ones were way too big. Who needs that many nuts? So I went out and bought more medium pots. Then I was left with two sizes. After spray painting them (first with a glossy finish, which I didn't like, and then two coats of a matte finish), I decided to paint the rims different colors. I got out my acrylic paint, thinking it would cover the black spray paint perfectly.
The first coat was very disappointing.
You could still see the black paint, and the blue and purple paint dried black. I didn't give up yet, though. I thought a second coat would work.
Although it was better, I knew a third coat would be needed. But I also knew I wasn't liking it. The colored rims just didn't seem right to me. So back out to the garage they all went for another coat of spray paint. (That's four coats, if you're keeping track, and a few needed a fifth coat.)
So if I had to do it again, I would skip the colored rims and go with different colored buckles instead. And I think I would use black craft foam instead of poster board to make the brims of the hat a little thicker.

UPDATE:
I ended up making little name cards that fit perfectly on top of the buckles. I used brightly colored card stock and wrote the names with a Sharpie.


**Linking up to Crafty Moms Share!**

Saturday, November 19, 2011

Turkey Windsocks

Here's a simple project to make a decoration for above your dining room table for Thanksgiving. You just need different colors of construction paper and crepe paper. We also used a turkey head coloring sheet,
but it would look really cute with a head made out of construction paper. You could even trace your child's foot! Anyway, I cut out three different sized "feathers" that looked like they were spread out.
The kids glued the medium sized feathers to the large feathers, and then glued the small feathers to the medium feathers.
Then they glued 3 different colors of crepe paper streamers onto a strip of brown construction paper. (I had cut the paper into thirds.)
Then I rolled up the strip of brown paper, stapled it closed, then stapled it to the group of feathers. Then I stapled the turkey head on.
I hung them from the ceiling with our roly poly turkeys.
I will send them home next week so the kids can use them as decoration for Thanksgiving.

**Linking up to Show-n-Share Saturday, TGIF Linky Party, and Crafty Moms Share!**
Thursday, November 17, 2011

Turkey Display

I saw this adorable bulletin board here and just had to copy it. Each child disguised a turkey by putting it in a costume. First, I had them color a turkey,
then I asked them what costume they wanted. I drew the basic stuff, nothing major. This was for a princess:
This was for a mermaid:
And this was for a witch:
Then the kids colored the costumes using crayons.
I cut everything out (and cut off the turkey feathers for a better fit) and they glued the costume to their turkey.
Then I had a few of the kids make signs telling people to eat something else.
I displayed them in the hall with the title, "No turkeys here!"

Maybe it's the vegetarian in me, but I just love this! Our other costumes were an octopus, a spider, a lion, Batman, a turtle, a ghost, and a cheetah. I think it would have been fun to send the turkeys home and have the kids make disguises with their parents and then bring them back to school, but there's always one or two families that don't seem to do "homework" and I didn't want anyone left out. I only had ten costumes to make, so it wasn't so bad.

Wednesday, November 16, 2011

Kangaroo Snack Cups

After discussing the letter K today and learning about kangaroos, we made a kangaroo craft. I've done a kangaroo craft in the past, and I could have done it again because I have a different group of kids, but I wanted to do something new. So I searched around online and came across a craft from Danielle's Place of Crafts and Activities. You can check out that link to find the complete instructions. She used her kangaroo cup for a flower and I thought it would work for a snack. So I took her pattern, but made the legs a little smaller because I was using dixie cups. I also cut everything out of paper instead of craft foam. I was just using what I already had available.
Each kid took one set of legs, one head, two ears, two arms, and two wiggle eyes. They used crayons to color all the body parts and then glued it together.

I used glue dots to glue the legs to the cup and to glue the stick to the inside of the cup.

We did try painting the dixie cups, but they got all mushy and kind of gross, so we ended up just using plain cups. I like the polka dots! I do think a bigger cup would look better, but I already had the dixie cups on hand for a different project. I also had some left over bags of fish crackers from trick-or-treating (I like to give crackers instead of candy to the wee little ones), so I put a bag in each "pouch."
I think they turned out pretty cute!

Fun Fact: A big kangaroo can leap up to 25 feet in one bound!

Monday, November 14, 2011

Roly Poly Turkeys

We started making Thanksgiving crafts today, and first up was a roly poly turkey!
We started with this:
A long brown rectangle cut from construction paper, a yellow "head and neck", a beak, some feathers, and wiggle eyes stuck to glue dots. The kids glued some feathers onto one end of the rectangle.
Then I rolled up the rectangle and stapled it.
The kids put eyes, a beak, and a snood (drawn with a marker) on the turkey face.
They were then glued to the rolled bodies.
They now hang from the ceiling with our turkey windsocks!