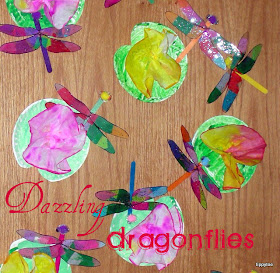
I am very excited to tell you how we made our beautiful dragonflies! I just made it up as we went along and it actually worked! I made my "example" at the same time the kids made theirs. I started by tracing dragonfly wings onto laminating sheets. (I used a coloring sheet from here as my template, but I moved it a bit while tracing to make sure my wings all touched each other to make it easier to cut out.) I was able to fit three sets of wings on one page. As the children came to make their project, I wrote their name next to the set of wings they chose. We rubbed a glue stick onto the wings and then applied cut-up tissue paper.
When I had all three wings filled up, I laminated them.
You could probably use contact paper, but it wouldn't be as clear or shiny. After they were laminated I cut them apart and we painted them with watered-down glue.
This is where I got worried that the beautiful wings would be ruined. I had no idea if the glue would dry completely clear or not. After the glue, we used my salt-n-pepper-turned-glitter shakers to add a little bit of sparkle.
The shakers were key because if we just sprinkled glitter from a spoon or the big bottles or even with our fingers, it would have been too much and would've covered our tissue paper completely. The little shakers let out the perfect amount.
Then we let them dry and I crossed my fingers that they would dry clear. I've used watered-down Elmer's glue for lots of things before, but it was always on paper, not something transparent. But it worked! I was excited! I cut out all the wings.
Next, we went on to the body. We used colored popsicle sticks (regular size) and used a mini glue dot to add a sparkly pom pom to one end. (I had them left over from my Horton Hears a Who craft). We also used mini glue dots to attach wiggle eyes to the pom pom. Those glue dots were a lifesaver because I don't think regular glue would've worked. Although a glue gun would probably work if you wanted to go that route.
Then we put a drop of glue on our stick behind the head to attach the wings.
And here's how they turned out:
Dazzling, I tell you! I love them! I decided to attach them to the water lilies we made earlier in the week.
For another dragonfly craft, you can see how we made them with a clothespin here.
Fun Fact: No other creature is better at hunting in the air than the dragonfly.
**Linking up to the parties on my sidebar!**


Wow I love them. What a great idea.
ReplyDeleteGoing to share on love all blogs
These are so awesome I love them. We are currently working on Life in a Pond and dragonflies are one of the creatures there. How great to have this idea now. When I post I will link to you. I just love this idea!
ReplyDeleteWow! There are super cool!
ReplyDeleteThese are absolutely adorable. What a fun craft idea. Jodi @ www.meaningfulmama.com
ReplyDeleteI really like these Bets, esp. the one with a lot of glitter in the 2nd to last picture.
ReplyDeleteThanks, Nanc! I think that extra sparkle is actually from my flash. Looks cool, doesn't it?
ReplyDeleteBEAUTIFUL! I am a new follower stopping by from Show and Share! Morgan www.tottreasuresnorthbay.blogspot.com.
ReplyDeleteThese r so cute! Frogs and snails and puppy dog tails
ReplyDeletefound u on the sunday showcase:-)
Thanks for adding your link to our BowdabraBlog.com Link Party
ReplyDeleteSo stinkin' cute!
Hope to see you back again, for our next Saturday Showcase.
Thank you so much for linking up in our Saturday Showcase this past week! We were thrilled to have you and hope that you stop back in on Saturday and link up more crafty ideas!
ReplyDeleteWe love all the post for kids that you linked up!
Have a super weekend!
Susie at Bowdabra
http://bowdabrablog.com/
Beautiful!! I love it! Thank you for sharing at Sharing Saturday!! I hope you are having an amazing week!
ReplyDelete