Friday, September 30, 2011

Fall Tree

We did a class project today. It's quite simple and I'm sure you've seen it before. I used a big sheet of white paper and stuck it to the wall. Then I took brown paint and made a tree.
The kids then took turns making hand prints on the tree.
I wish I had used a lighter paint or even crayons for the trunk and branches so the leaves would stand out more. Oh well. Then I moved the tree to our door and added "Welcome Autumn!" to disguise my horrible attempt at cutting in a straight line.
Have a great weekend!

Thursday, September 29, 2011

Dinosaur Fossils

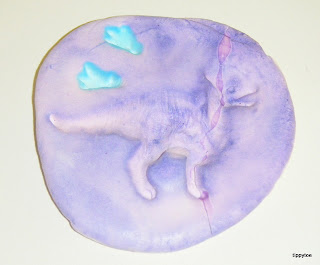
We learned about the letter D today, so our art project had to do with dinosaurs (one of my favorite themes). A couple of days ago, I brought in some Model Magic by Crayola. I flattened out a small amount for each child and asked the kids to pick out a small plastic dinosaur. They pushed it into the "clay."

Because they weren't flat, we had to kind of roll the dino around so all the parts made a print. Then the kids stood the dino up and made prints of the feet.
I let the "fossils" sit on the window sill for two days. They don't ever get really hard, but they do get somewhat firm.
Today the kids used watercolors to paint them.
The paint made the imprints more visible.

Here's mine from years ago. It broke last year so I had to glue it.


Fun Fact: Pteranodons, or any of the flying prehistoric creatures, were not dinosaurs. They were related to the dinosaurs, but true dinosaurs could not fly.

Wednesday, September 28, 2011

Acorn Painting

I have another project to share with you and this one did not disappoint! We have a huge oak tree right next door to our center and we are always finding acorns on our playground. So yesterday I had the kids collect some. It had been raining for a few days and I wanted them to dry out overnight. I took the shell off of some of them.
These aren't your typical acorns, with the cute little caps, but they still worked. (I think they are from a Bur Oak tree, but I'm still doing some research to figure it out.) I plunked 2 in each cup of paint and added a spoon for scooping.
I told the kids our project would be just like marble painting, except we'd use acorns. I was shocked to find out that none of them have ever marble painted before! The horror! <smile> So I told them what to do, step by step. Luckily, it's pretty easy and they caught on very quickly. First you put your paper in a box (I used old puzzle boxes that we no longer use) and scoop out an acorn from one of the cups. Then you plop it on your paper and tilt the box in all kinds of directions.
When you are low on paint, just put it back in the cup and do it again. You can add more and more colors, too.
Here is a look at our finished masterpieces:
Gorgeous! I love the speckled look. I think I will matte these on colored paper and hang them up. I love them!

Here's an acorn song for you. The <cluck> refers to that noise you make when you drop your tongue from the roof of your mouth to the bottom of your mouth. Know what I mean?

I'm a little acorn round,
Lying on the cold, cold ground.
Everybody steps on me,
That is why I'm cracked, you see.
I'm a nut. <cluck, cluck>
I'm a nut, I'm a nut, I'm a nut. <cluck, cluck>

**Linking up to Show-and-Share Saturday and The Sunday Showcase!**

Tuesday, September 27, 2011

Apple Prints

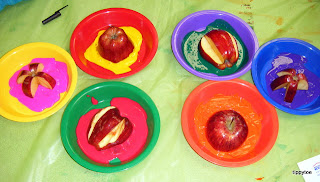
So this didn't really turn out as I hoped. I've seen beautiful apple prints on other blogs, but it never seems to work for me. I had 3 apples and cut them up 3 different ways. One was the long way (with some wedges removed to make handles), one was horizontal across the middle (so you see a star), and the last one was horizontal with some chunks taken out so it looked like a flower or pinwheel. I put the apple halves in paint.
I decided to try this myself before the kids got to the table.
Not bad, but not like what I've seen online. Then I tried the flower-shaped apples.
Way cool! (Got that idea from here.) You still can't really see the star in the middle, but I like it! I'm going to have to remember this next spring.
The kids still had a blast doing it, and that's all that matters.
I was the only one disappointed with the results.
Maybe I'm not cutting the apples straight or using too much paint or not enough. I don't know. What I do know is that from now on I'm cutting designs in the apples. Those prints turn out much better. Anyone else have problems with this one?

Monday, September 26, 2011

Rainy Day Disco Party

Today was a very dark and rainy day (in the morning, at least). So before I left the house, I grabbed my disco light that I bought from Party City more than a decade ago. During our large motor time, I closed the curtains, turned off the lights, put on some dancing tunes, and plugged in my globe. It was very cool! Obviously these pictures aren't great, but it gives you an idea of what it was like.


Fun was had by all. And we are learning about the letter D this week, so it totally went with our curriculum!

I'm a Guest Blogger!

I just wanted to let you all know that I am guest posting over at I Heart Crafty Things today! Stop by if you get a chance. And spend some time at Rachel's blog. It's awesome!

Sunday, September 25, 2011

YAH: Fall Wreath

What's YAH, you may ask? It stands for Young-at-Heart crafts. It's true. I don't only make crafts with and for kids. I also enjoy making them for myself! So today I am sharing the fall wreath I made only an hour ago. I went to craft stores (Michaels and Jo-Ann Fabrics) several weeks ago and found a few things I thought would work for a wreath. Today is a rainy Sunday, so I finally decided to get to work.
I got two strands of leaves, a strand of berries and a few acorns. Everything was at least 40% off. I bought the twig wreath last year with the intention of making something, but it didn't work out. I'm happy that I am finally using it now! I took one strand of leaves and just wrapped it around the wreath.
I cut off the extra. Then I did the same with the other strand of leaves, again cutting off the extra.
Then I carefully wrapped the berries around the wreath. This was a little trickier because they are more delicate and get tangled easily. Then, after some fluffing, I used floral wire to attach the strands to the back of the wreath in a few places.
Then I used the leftover pieces to fill in some gaps.
Finally I hot-glued the acorns into place.
I don't have the kind of door on which I can hang a wreath (that's on my wish list!), so I hung it in our foyer.
That's one of the few walls in the house that I haven't painted yet. It really needs some color! Someday...
Here are a few other fall decorations I made with supplies from Michaels. The first is scented pine cones with pumpkins.
I put them in a glass bowl my mother-in-law gave us for our wedding. It's so pretty. And the pine cones make the whole kitchen and dining room smell like cinnamon!
I also put some glass acorns and pumpkins in a vase (also a wedding gift) and added some fall-colored flowers and berries.
We had recently bought some new cookbooks that weren't put away yet. I noticed they were fall colors, so I used them as decoration under the vase. They are in our dining room, so I think it goes well. And I love how it looks against my "chocolate" wall!

So there you have it. My first YAH post. I hope you enjoyed it!

**You will be able to find all my Young at Heart crafts under the tab at the top of my blog.**

Friday, September 23, 2011

Fall Reflections


Get ready for a very cool art project. I love how these turned out! The one above was my example. It's so boring compared to what the kids made today! Start with a piece of white construction paper and fold it in half the long way.
Make a nice crease so the kids know where the middle is when they open the paper back up. Have the kids paint trees on just the top part of the paper, with the trunks starting at the crease and going upward. We used tempera paint. Then (and here's where the cool part comes in!) fold the paper again and gently press down. When you open it back up, you have a lighter version of what you painted on the bottom, only upside down.
Then add colorful leaves by dotting the paper with the paintbrush. And fold the paper and press down again.
You can keep adding to the trees, just make sure you fold the paper now and then before the paint dries.
You don't want to push the paint around, just gently pat the paper so the painting transfers. We also painted a strip of grass along the crease to give a better visual of where the horizon was.

When that is dry, use blue watercolors to paint the sky on the top.
Then paint the bottom part (the water) but this time paint right on top of the trees, not just the white parts of the paper. This will smear it a bit, but it will look more like water. I encouraged the kids to use a little more water with their paint than they did for the sky. That makes it easier for the brush to glide over your trees.
When everything was dry, we drew in a brown line along the crease, again to show the horizon better.
These turned out so cool! I hung them up with this title:
Don't you love fall crafts? Happy Autumnal Equinox!

P.S. To celebrate the letter C today, we had Crazy Hair Day! Here's a picture of a few of my kids: