Pages

Thursday, December 14, 2017

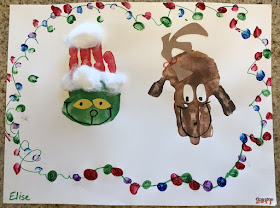
Handprint Grinch and Max

This was a fun craft for the kids. Who doesn't love the Grinch and his adorable dog, Max? I've seen a lot of handprint Grinches around, but I couldn't find any of Max so I just kind of made it up. For the Grinch I painted the palm green and the four fingers red (I didn't paint the thumb at all) and made a print. For the dog, the thumb and pinky (pinkie?) finger were painted dark brown (for the ears) and the palm and three other fingers were a lighter brown. And I made the print upside down. When the prints were dry, the kids added cotton balls to the Grinch's hat, yellow eyes made from construction paper, and drew in a nose and smile.
For Max I cut out an "antler" and the kids glued it to the top of the dog. I drew in a little bow. Then they glued on white ovals for eyes and drew in the nose and mouth. And just to make it a little more festive, they drew a curly line all around their paper and added colorful fingerprints for Christmas lights.
They turned out so cute!


Monday, October 16, 2017

Vampirina Craft

My daughter really likes Vampirina, a new show on the Disney Junior channel. So I quickly came up with a craft for her and a friend to make. We used a small paper plate for the face, painting it with a mix of white and purple paint with a touch of blue. When it was dry we added the facial features and hair. I cut out hair and bat-wing pigtails, as well as eyes, fangs and little pink pigtail holders.
The kids used a glue stick to attach everything. The pigtails were glued onto the back of the paper plate and I later added tape to secure them even more.
They used a black marker to make eyelashes, eyebrows, a nose and a mouth.
The pigtail holders were glued onto the hair, but I think it would look better if they were glued onto the actual pigtails. The reason I didn't have the kids do this was because I was planning on having the other side of the plate be a regular bat. (In the show, Vampirina can change from a little girl to a bat.) The pigtails would be the wings so I didn't want the pink holders to show on the other side. However, we never ended up doing that because the Vampirina craft already looked like a bat.

I added a large craft stick (from CraftProjectIdeas.com) so the girls could use them like puppets. The pigtails actually flap like wings when they play with it. It's quite cool! And for that reason I recommend using black card stock paper so the bat-wing pigtails are sturdy. They turned out so cute and the girls have been playing with them for days!

Thursday, April 13, 2017

Silhouette Bunny Art

Here's a fun and easy Easter project for the kids to do! Cut out a bunny shape and tape it to white paper. Use Do-a-Dot markers to stamp around the bunny, making sure to overlap onto the bunny's edges. Feel free to add some dots "floating free" around the bunny as well.
Peel off the black bunny and you are left with a beautiful bunny silhouette!
I only taped the black paper in two spots so it would be easy to take off, but that means some of the ink got under it. Maybe using a thicker paper would help. I used black construction paper and white cardstock paper. When I had some kids do this project I had to remind them to make dots all around the bunny shape so you can see an outline when you take the black paper away.

They did a good job, but I helped them fill it in a little.


Quick and cute!

Wednesday, March 29, 2017

Marble-Painted Bunnies

These adorable bunnies will definitely add some Spring color to your home or classroom!
I traced my bunny template onto white cardstock and the kids marble-painted it with bright colors.
I used a colored marker to outline the bunny so when I cut it out it would have a border. But it also helped me see where to cut when the paper was covered in paint!
The kids picked out a little pom pom to glue on for the tail.

They would also look good glued onto another piece of paper, either a bright color or even black.
But I decided to leave them alone. I did, however, end up using the rest of the marble-painted paper because it was too pretty to throw away. I glued it onto another piece of paper and added a cotton ball for the tail. This way each child had 2 bunny crafts!


Just be sure to cut the bunny out carefully, only making one small cut on the bottom that can easily be hidden.

Thursday, February 9, 2017

Dot Art Suncatchers

Last year I shared snowman suncatchers that were made by painting a paper towel and framing it with black construction paper. This year I decided to use Do-A-Dot markers and boy, they did not disappoint! We chose to make hearts for Valentine's Day. First you make some dot art on a white paper towel.
The more dots, the better!
When they are dry, cut a heart out of black construction paper. Save the heart for a different project and glue the remaining paper onto the paper towel. Hang in a sunny window and enjoy!

I love it with the black frame! This year we made our snowmen with dot markers as well. Faster, brighter and easier than using paint!

Friday, January 20, 2017

Printed Igloos

My daughter and I made really "cool" igloos by painting a piece of bubble wrap and making a print. I got the idea from Crafty Kids at Home. You want to have your paper ready before you paint. We used blue cardstock with a strip of white on the bottom for snow. Then draw a simple igloo shape on the smooth side of bubble wrap and cut it out. Have your child paint the bubble side with white paint. We used a sponge brush.
Quickly flip the bubble wrap over onto the paper before the paint starts to dry. Press down gently without moving the bubble wrap around.
Then carefully peel off the bubble wrap. We also made snowflakes with a Q-tip dipped in white paint. And to finish it off, we added a snowman sticker!
I traced around the igloo with a white crayon just to define it more. I also liked how it looked without painting the bubble wrap. You could just glue it on your paper and the glue would dry clear.
But the painted print does stand out more.
Make sure you check your bubble wrap for popped bubbles. Sometimes a whole row will be flat and won't leave a good print. Have fun adding all kinds of things to the scene!

Sunday, January 15, 2017

Paper Towel Suncatchers

I recently bought paper towels with Frozen characters on them. I thought my daughter would like to paint them. We had Anna, Elsa and Olaf.
I decided to trace Anna and Olaf with a black Sharpie to make it easier for my 3-year-old, but I left Elsa alone because I was curious which would look better.
I experimented with a couple different paints to see what worked best. I had regular watercolors and glitter acrylic paint which I received from CraftProjectIdeas.com. We started with Olaf.
The watercolors were brighter, but they needed a lot of water. We kept having to dip the brush in water in order to get the paint to spread. The glitter paints were easier to work with, but often quite pale so we needed a lot. When she was done painting, I thought it would look neat hanging in a window with the sun shining in.
By the time we got around to painting Anna and Elsa, my daughter had enough so she only painted a few parts and I finished them.

I like how the white acrylic paint actually shows up!
And as always, it's so hard to get a good picture of a suncatcher, but they really are pretty in the window.

 If you don't have prints on your paper towels, you could always draw your own design with a Sharpie!