Wednesday, November 30, 2011

Grouchy Ladybugs

Today we read Eric Carle's The Grouchy Ladybug. I taught the kids all about these tiny beetles and then we got to work on making some. I got my idea from here, but I changed it a bit. We started with these materials:
Rolled up strips of black paper, wiggle eyes on glue dots, wings,
black dots (that I made with a hole punch), and heads that were oval and had a small accordion-folded strip on them.
First, the kids glued the dots to the wings. (Actually, those are the elytra, which protect the ladybug's flight wings, but I'll just refer to them as wings for this post. Whenever I teach the kids about animals, I always try to use correct terms.)
Then they glued the wings onto the rolled up body.
Next, they added some wiggle eyes to the head and glued the accordion strip to the body.

Then I poked two holes in the head and used black pipe cleaners (cut small) for antennae. I slid the pipe cleaner through the hole,
then twisted the ends together and bent the tip over.
Sadly, those pipe cleaners were a little too heavy for most of our heads and they needed some more gluing to stay up. It would have been cute if the heads were able to stay afloat, but this was the best I could do:
To tie this in to the story, I asked the kids what made them grouchy and wrote it on the bottom of a leaf.
Then I stapled the ladybug to the leaf.
Next time I will just use paper antennae so the heads can be bouncy. I don't know why they need to be bouncy, but they sure were cute that way!

Fun Fact: The elytra on a ladybug are always mirror images of each other.

**Linking up to Crafty Moms Share!**

Tuesday, November 29, 2011

Push-Paint Creations

We read Brown Bear, Brown Bear, What Do You See? today. I know it isn't written by Eric Carle, but he illustrated it so I included it in our lesson this week. To go along with the story, we made push-paint art. The kids took a creased piece of paper and put a few globs of paint near the center.
Then they folded the paper and pushed the paint around. When they opened the paper back up, there was a beautiful work of art.
So I asked the kids, "What do you see?" I encouraged them to look at their painting from all angles and then I wrote their answers on the paper, adding "looking at me."


I had printed this out on my computer:
And I displayed the art around it.
I borrowed this activity from my former co-teacher. Thank you, Miss Sara!

**If you liked this, check out our push-paint monsters!**

Monday, November 28, 2011

Seahorse Suncatchers

Check out these beauties:
Wanna know how we made them? Ok! But first a little background. We are reading Eric Carle books this week and today's book was Mister Seahorse. After reading the story I taught the kids all about seahorses. Then we made suncatchers using the same method we used for the stained glass apples. I put out seahorses that I had traced onto white paper and bowls of tissue paper squares and triangles.
I also put out watered-down glue with paint brushes. The kids painted the seahorses with the glue.
Then they added tissue squares.
Then they painted another layer of glue on top of the tissue squares.
I decided I wanted these seahorses to have a little sparkle, so I got out my mini salt and pepper shakers filled with glitter.
I love these things. Only a little bit of glitter comes out with each shake. They are perfect for projects that only need a dash of sparkle. The kids shook the shakers over the tissue squares and, because of the top layer of glue, the glitter stuck.
Then they added a fluorescent wiggle eye.
I'll tell you right now, that watered-down glue was not enough to keep the eye on. After they dried and I was cutting them out, almost every single eye popped off. But a drop of Elmer's was all it took to make them stick. Didn't these turn out beautifully?
I hung them in the window just as the sun was beginning to go down (around 4:00, sadly) and it was hitting the window juuuust right, and I think I finally got a good picture of a suncatcher.

Ahhhhhhhhh.....

Fun Fact: Seahorses, the slowest moving fish, do not have stomachs. Because food passes through their digestive systems so quickly, they need to eat constantly in order to stay alive.

**Linking up to Crafty Moms Share and I Can Teach My Child!**

Tuesday, November 22, 2011

Handprint Mayflowers

I found this adorable Thanksgiving craft here and changed it up a bit. First I got a brown handprint from all the kids as they were dropped off in the morning. I wanted the paint to be dry by the time we did the art project. I used light blue construction paper and told the kids to spread their fingers as far apart as they could.
Then I made little white sails for the kids to glue on three of the fingers.
For the sea, they tore strips of dark blue construction paper and glued it under their hand.
And they also tore up white paper to make clouds.
Then I wrote The Mayflower in dotted lines for the kids to trace.
That way there was no question as to what ship this was.


So cute, right? Happy Thanksgiving!!

Sunday, November 20, 2011

YAH: Clay Pot Pilgrim Hats

I have another Young-at-Heart craft to share with you! My mom asked me if I'd make nut cups for Thanksgiving this year. I was very excited about this and started searching online right away for ideas. I came across some pilgrim hats made out of cups or flower pots. I thought that would be perfect! They can be decoration at first, but when you flip them over they become nut cups! So I bought two different sizes of clay pots. I got the 2-and-a-half inch pots for the adults and kids, and tiny ones for the babies (just because they were so cute). I also got silver glitter craft foam (for the buckle), black poster board (for the brim), and matte black spray paint.
I wanted to cover the holes in the bottom of the pots, so I cut out small circles from the poster board and glued them to the pots.
Then I took them out to the garage and spray painted them. I gave them two coats.
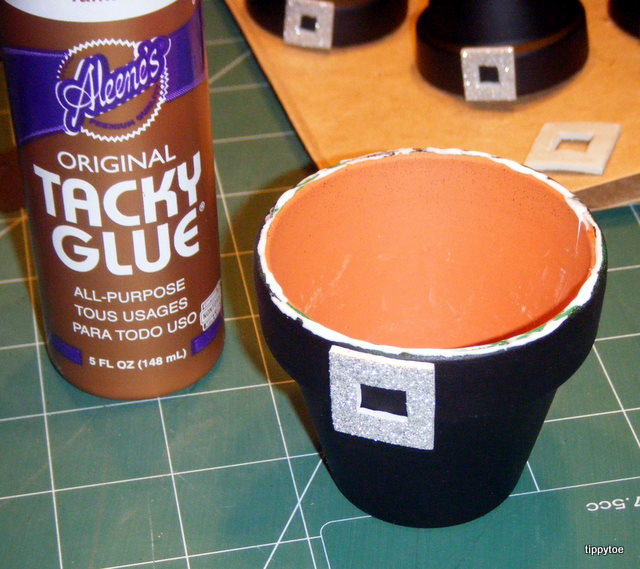
If I only had a few to make, I probably would have just painted them with a brush, but I had to make 20 so this was much faster. Once dry, I got to work on the buckle. I made a template out of poster board. I just made a square and cut out a smaller square from the middle. Then I traced that on the back of the glitter craft foam.
I also made a smaller version for the tiny pots. I used a scissors to cut the big square, but used an X-acto knife to cut out the middle square. This was a big pain in the you-know-what. No matter how carefully I traced and cut, each buckle was a different size/width and not straight at all. After awhile I just cut the big square, then folded the foam piece in half and used the scissors to cut out the smaller square. That was much faster and gave the same results (crooked, all different sizes) so I just stuck with that. Hey, if it's going to turn out the same, why not do it the faster way?
I really had to force myself not to worry about how imperfect they were. It was tough! Anyway, I used mini glue dots cut in half to glue them on the pots. (This was after trying to use craft glue. I didn't like that because the buckles slid around too much and I had to hold them on for a very long time. Glue dots worked like a charm.)
Is it starting to look like a pilgrim hat? Or a witch hat? Then I made a template out of poster board for the brim. I traced a mug for this, but because I'm using them as nut cups I needed another circle to be cut out of the inside. I traced a dixie cup for that.
It overlapped the clay pot rim just a bit, which was nice because then it would cover up the messy paint area.
I used a toothpick to put craft glue on the rim of the pot.
Then I attached the poster board to the rim. I made a smaller version for the tiny pots. I really like how they turned out. I think different colored glitter foam would have been a nice touch, but I didn't want to run back to the store.
Then, when it's time to fill them, flip them over and add dixie cups to the big pots and paper nut cups to the little ones.
I had thought about putting names on them with a metallic sharpie, and then using them as place cards as well, but different people are at Thanksgiving dinner every year and the babies this year won't be babies next year, so I left them plain. Although, using a chalkboard paint and chalk would solve that problem.

BEHIND THE SCENES:
I originally was going to make three different sizes of pilgrim hats. The biggest for the adults, medium for the kids, and tiny for the babies.
Here's what happened right before I took that picture:
Pretty little Duma always looking for food. Anyway, after noticing that my dixie cups fit perfectly in the medium pots, I thought the big ones were way too big. Who needs that many nuts? So I went out and bought more medium pots. Then I was left with two sizes. After spray painting them (first with a glossy finish, which I didn't like, and then two coats of a matte finish), I decided to paint the rims different colors. I got out my acrylic paint, thinking it would cover the black spray paint perfectly.
The first coat was very disappointing.
You could still see the black paint, and the blue and purple paint dried black. I didn't give up yet, though. I thought a second coat would work.
Although it was better, I knew a third coat would be needed. But I also knew I wasn't liking it. The colored rims just didn't seem right to me. So back out to the garage they all went for another coat of spray paint. (That's four coats, if you're keeping track, and a few needed a fifth coat.)
So if I had to do it again, I would skip the colored rims and go with different colored buckles instead. And I think I would use black craft foam instead of poster board to make the brims of the hat a little thicker.

UPDATE:
I ended up making little name cards that fit perfectly on top of the buckles. I used brightly colored card stock and wrote the names with a Sharpie.


**Linking up to Crafty Moms Share!**